Ardumower Chassis 'mountain mod': Unterschied zwischen den Versionen
Aus www.wiki.ardumower.de
(→Pictures) |
(→Pictures) |
||
| Zeile 23: | Zeile 23: | ||
<gallery> | <gallery> | ||
| − | |||
| − | |||
File: Ardumower_mountains_side.jpg| Inside (prototype) | File: Ardumower_mountains_side.jpg| Inside (prototype) | ||
| − | File: | + | File: Ardumower_mountain_tires_profile.jpg | modified tire profile |
| − | + | ||
| − | + | ||
| − | + | ||
| − | + | ||
File: Ardumower_mountains_inside.jpg | Inside (PCB) | File: Ardumower_mountains_inside.jpg | Inside (PCB) | ||
</gallery> | </gallery> | ||
Version vom 5. April 2015, 16:53 Uhr
Inhaltsverzeichnis
Abstract
This page describes how to modify the Ardumower Chassis to run up higher slopes with it (tested up to 45 percent). This works by
- turning the front drive into a rear drive and so requires to reverse the drive direction (so front is back and back is front)
- modifying the tire profile (give it more grip)
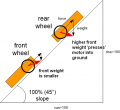
difference front/rear wheel

Needed parts
- cup
- acrylic glas sheet
- rubber band
Turning front drive into rear drive
- swap motor cables (right and left)
- swap odometry cables (right and left)
- swap battery charging pin cables (right and left)
- disable ultrasonic sensor
- move perimeter coil from old front to old back side
Pictures
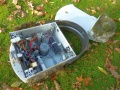
Inside (prototype)
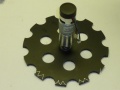
modified tire profile
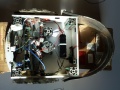
Inside (PCB)


