Azurit Firmware (English)
Inhaltsverzeichnis
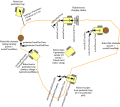
Download and flash Arduino code
NOTE: If you have never worked with Arduino before, read our 'Arduino first steps' introduction.
You have two options:
- Download github code (recommended) OR
- Download v0.9.3 code (old, not recommended)
Finally, download and start the Arduino IDE to flash the code to your Arduino.
Arduino Version: It is very Importent that you use the Arduino IDE version 1.6.3 or above AND select the right Board (Mega 2560 or Due).
![]() Important for Arduino IDE 1.6 or higher: if you see any folders inside the code folder (e.g. 'unused'), please delete them before compilation! Note: Always verify that the pin configuration in your Arduino code (config.h/mower.cpp) matches your actual circuit!
Important for Arduino IDE 1.6 or higher: if you see any folders inside the code folder (e.g. 'unused'), please delete them before compilation! Note: Always verify that the pin configuration in your Arduino code (config.h/mower.cpp) matches your actual circuit!
Settings
The robot uses settings that you can adjust for your own robot and environment (via pfodApp or directly in the code). The default settings (factory settings) are stored in the config file 'mower.cpp'. In this file you can find a description of all settings.
The settings can be adjusted via Android phone (pfodApp).
Visualization of settings
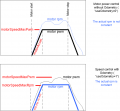
Motor speed settings


Important: If you uploaded a new version into your robot, reset all settings via pfodApp once (Settings->Factory reset). This will delete all existing settings. Old settings can produce malfunction if the internal settings format has changed.
First-time usage
1. At first, deactivate all sensors - In 'mower.cpp' set the robot settings like this:
bumperUse = 0;
dropUse = 0;
rainUse = 0;
sonarUse = 0;
perimeterUse = 0;
lawnSensorUse = 0;
imuUse = 0;
batMonitor = 0;
odometryUse = 0;
gpsUse = 0;
buttonUse = 1;
timerUse = 0;
2. The software offers a serial console mode. Open the serial console in the Arduino IDE (CTRL+SHIFT+M) and set the baudrate to 19200. The motor and sensor values should appear constantly. First let's delete any existing error. Send the letter 'd' to the Arduino.
Console:
press...
d for menu
e=delete all errors
3. Run the ADC calibration, so that the ADC signals are symmetric around zero.
pres...
8=ADC calib (perimeter sender, charger must be off)
4. Save user settings
press...
9=saver user settings
5. Test motors:
press...
1=test motors

Security note: For security reasons, always remove mower blades in your first tests!
You should verify that the wheel motors are controlled correctly and in the right direction. Increase 'motorAccel' in 'mega.cpp' if the motors are not accelerating quickly enough.
Starting the mower
To start the mower, you need to add a button and a buzzer:
pinButton —o Button o— GND (button for ON/OFF)
pinBuzzer —o Buzzer o— GND (Piezo buzzer)
Now, press the button as long as you hear the beeps:
Mode (press button for x beeps):
1 beeps : Normal mowing (using blade modulation if available)
2 beeps : Normal mowing (without blade modulation)
3 beeps : Drive by model remote control (RC)
4 beeps : Drive without mowing
5 beeps : Find perimeter and track it
Diagnostics/troubleshooting
Each time a sensor triggers, its corresponding sensor counter increases. The sensor trigger counters as well as the current sensor values can be viewed on the serial console. The following values are shown for the trigger counters in the serial console:
- Time of state machine's state (ms)
- loop()-counts per second
- choosen Verbose-Mode (0=counter readings/1=current values/2=current values)
- current state machine state (FORW, REV, ROLL etc.)
- drive home? (1/0)
- "spd" - Control/speed motors: left (PWM), right (PWM), mower (RPM)
- "sen" - Current limit exceeded counter motors: left, right, mower
- "bum" - bumper counter: left, right
- "son" - Ultrasonic-distance threshold exceeded (counter)
- "pit/roll" - Tilt (computed by acceleration sensor)
- "com" - compass course
- "per" - Perimeter loop detected: counter
- "bat" - Battery voltage
- "chg" - Charging current
Using the key 'v', you can toggle between sensor trigger counters and current sensor values.
![]() Additionally, you can use pfodApp (Android) to plot the sensors (trigger counters and current values) over time. This allows you to wirelessly monitor your robot mower for error diagnostics. It is highly recommended.
Additionally, you can use pfodApp (Android) to plot the sensors (trigger counters and current values) over time. This allows you to wirelessly monitor your robot mower for error diagnostics. It is highly recommended.
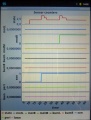
Sensor trigger counters
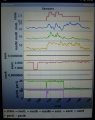
Sensor measurement values
Ardumower states


Error codes and troubleshooting
http://wiki.ardumower.de/index.php?title=Troubleshooting
Error counter / error beeps
If there's a communication problem or another serious problem, the error counter increases. The error counter can be monitored via pfodApp. Additionally, the robot mower will beep when started.
See section Troubleshooting for details on all errors.
I2C bus / error beeps
Several components (Arduino Nano, RTC, IMU, etc.) are communicating via the I2C bus (SDA/SCL wires). These wires should be very short (maybe even twisted) and they should be far away from DC converter and motor drivers. If there's a communication problem, the error counter will increase and robot will beep when started. The error counter can be monitored via pfodApp.