Ardumower Chassis 'mountain mod': Unterschied zwischen den Versionen
(→Turning front drive into rear drive) |
(→Abstract) |
||
| (39 dazwischenliegende Versionen desselben Benutzers werden nicht angezeigt) | |||
| Zeile 1: | Zeile 1: | ||
=Abstract= | =Abstract= | ||
| + | |||
| + | [[File: Ardumower_reverse_bumperduino.jpg | 400px]] | ||
| + | [[File: Mountains.jpg | 600px]] | ||
| + | |||
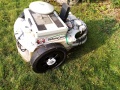
This page describes (as a 'hack') how to modify the Ardumower Chassis to run up higher slopes with it (tested up to 30 percent). This works by | This page describes (as a 'hack') how to modify the Ardumower Chassis to run up higher slopes with it (tested up to 30 percent). This works by | ||
#turning the front drive into a rear drive and so requires to reverse the drive direction (so front is back and back is front) | #turning the front drive into a rear drive and so requires to reverse the drive direction (so front is back and back is front) | ||
| − | #modifying the tire profile (give it more grip) | + | #optional: modifying the tire profile (give it more grip) |
##Modify tire profile OR | ##Modify tire profile OR | ||
##Off-road version (sand etc.): A bicycle tube or U-form rubber is added around the tire | ##Off-road version (sand etc.): A bicycle tube or U-form rubber is added around the tire | ||
| Zeile 12: | Zeile 16: | ||
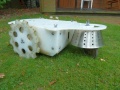
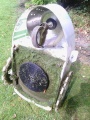
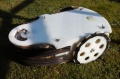
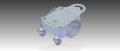
File: Ardumower_reverse_electronics.jpg | Ardumower electronics | File: Ardumower_reverse_electronics.jpg | Ardumower electronics | ||
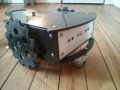
File: Ardumower_reverse_bumperduino.jpg | Ardumower BumperDuino | File: Ardumower_reverse_bumperduino.jpg | Ardumower BumperDuino | ||
| + | File: Mower_rear_docking.jpg.JPEG | rear docking | ||
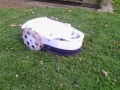
| + | File: Ardumower_250mm_rubber_tires.JPEG | 250mm rubber tires | ||
</gallery> | </gallery> | ||
| Zeile 20: | Zeile 26: | ||
=Turning front drive into rear drive= | =Turning front drive into rear drive= | ||
| − | # swap motor cables (right and | + | # on Ardumower PCB, swap right motor cables with left motor cables (so left motor is right motor and vice versa) |
| − | # swap odometry cables (right and | + | # on Ardumower PCB, swap polarity of each motor by swapping motor (+/-) pins (so turning forward is turning backward) NOTE: for brushless motors, swap two arbitrary phases (U,V,W) to swap motor polarity |
| − | # | + | # on Ardumower PCB, swap odometry cables (so left odometry is right odometry and vice versa) |
| + | # mount battery charging pin at chassis handle side | ||
# disable ultrasonic sensor | # disable ultrasonic sensor | ||
| − | # move perimeter coil from old front to old back side | + | # move perimeter coil from old front to old back side (if using perimeter sensor) |
# use [https://wiki.ardumower.de/index.php?title=Bumper_sensor BumperDuino] as bumper sensor | # use [https://wiki.ardumower.de/index.php?title=Bumper_sensor BumperDuino] as bumper sensor | ||
| Zeile 33: | Zeile 40: | ||
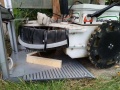
File: Ardumower_mountains5.jpg| Step 3: Add rubber band | File: Ardumower_mountains5.jpg| Step 3: Add rubber band | ||
File: ardumower_reverse_docking.jpg| Step 4: Reverse docking contacts | File: ardumower_reverse_docking.jpg| Step 4: Reverse docking contacts | ||
| − | File: Ardumower_mountain_tires.jpg| Step 5a: Modify tire profile | + | File: Ardumower_mountain_tires.jpg| Step 5a (optional): Modify tire profile |
| − | File: Ardumower_tire_rubber.jpg | Step 5b: 'Off-road' tire mod using rubber | + | File: Ardumower_tire_rubber.jpg | Step 5b (optional): 'Off-road' tire mod using rubber |
</gallery> | </gallery> | ||
| − | =New rubber tires= | + | =New rubber tires (optional)= |
| + | |||
| + | For even higher traction, one can use [https://www.marotronics.de/Air-wheel-260-mm-eg-for-Ardumower-handcart-wheel-hand-cart-wheel-wheelbarrow-wheel pushcart tires from the shop]. Using a 3d printed adapter one can mount them onto the Ardumower clamping element. '''Assembly note: The trick here is to first insert the long screws into both printed adapters and through the tire, and then rotate the adapters until they fit onto the tires. ''' | ||
| − | [[File: Rad_adapter2.JPG | | + | [[File: Rad_adapter2.JPG | 300px]] |
| + | [[File: Image_2022_03_25T08_07_16_090Z.png | 600px]] | ||
| + | [[File: Universal_tire_adapter.png | 300px]] | ||
pushcart tires adapter | pushcart tires adapter | ||
| Zeile 69: | Zeile 80: | ||
=Videos= | =Videos= | ||
| − | #[https://www.youtube.com/watch?v=-TdvEG2_eR0 BumperDuino] | + | #'''[https://www.youtube.com/watch?v=FsVMA81zLS8 Ardumower rear/front driven climbing difference]''' |
| + | #[https://www.youtube.com/watch?v=-TdvEG2_eR0 Ardumower rear-driven, BumperDuino demo] | ||
#[https://www.youtube.com/watch?v=8eR1v6ihGV8 pushcart tires] | #[https://www.youtube.com/watch?v=8eR1v6ihGV8 pushcart tires] | ||
#[https://www.youtube.com/watch?v=Z8RBlNjtH9M&feature=youtu.be Demo] | #[https://www.youtube.com/watch?v=Z8RBlNjtH9M&feature=youtu.be Demo] | ||
#[http://youtu.be/3-UoYhjYH2w Optimized tires] | #[http://youtu.be/3-UoYhjYH2w Optimized tires] | ||
#[https://www.youtube.com/watch?v=Pgj6wwDrps4 Bicycle tube tires for 'off-road'] | #[https://www.youtube.com/watch?v=Pgj6wwDrps4 Bicycle tube tires for 'off-road'] | ||
| − | |||
=Other ideas= | =Other ideas= | ||
Aktuelle Version vom 14. Mai 2022, 19:30 Uhr
Inhaltsverzeichnis
Abstract


This page describes (as a 'hack') how to modify the Ardumower Chassis to run up higher slopes with it (tested up to 30 percent). This works by
- turning the front drive into a rear drive and so requires to reverse the drive direction (so front is back and back is front)
- optional: modifying the tire profile (give it more grip)
- Modify tire profile OR
- Off-road version (sand etc.): A bicycle tube or U-form rubber is added around the tire
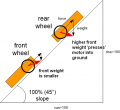
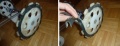
difference front/rear wheel

environment with slope
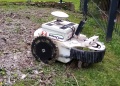
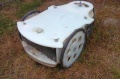
Ardumower going on a Safari
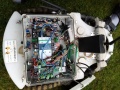
Ardumower electronics
Ardumower BumperDuino
rear docking
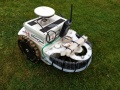
250mm rubber tires


Needed parts
- cup
- acrylic glas sheet (1mm)
- rubber band (U-form)
Turning front drive into rear drive
- on Ardumower PCB, swap right motor cables with left motor cables (so left motor is right motor and vice versa)
- on Ardumower PCB, swap polarity of each motor by swapping motor (+/-) pins (so turning forward is turning backward) NOTE: for brushless motors, swap two arbitrary phases (U,V,W) to swap motor polarity
- on Ardumower PCB, swap odometry cables (so left odometry is right odometry and vice versa)
- mount battery charging pin at chassis handle side
- disable ultrasonic sensor
- move perimeter coil from old front to old back side (if using perimeter sensor)
- use BumperDuino as bumper sensor
Step 1: reverse the direction (front and back), add cup
Alternative: reverse the direction (front and back)
Step 2: Add acrylic glass sheet (1mm)
Step 3: Add rubber band
Step 4: Reverse docking contacts
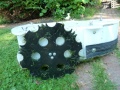
Step 5a (optional): Modify tire profile
Step 5b (optional): 'Off-road' tire mod using rubber


New rubber tires (optional)
For even higher traction, one can use pushcart tires from the shop. Using a 3d printed adapter one can mount them onto the Ardumower clamping element. Assembly note: The trick here is to first insert the long screws into both printed adapters and through the tire, and then rotate the adapters until they fit onto the tires.


pushcart tires adapter
version 1 (OpenSCAD): https://drive.google.com/open?id=1b2QyTGZAHqlq3FxoZMuL9yAjkAN27W_W
version 2 (STL): https://drive.google.com/open?id=1Z5-RnOGF6VBqRKgV-_IFwwNccazjhj48
https://forum.ardumower.de/threads/traktion.22179
https://forum.ardumower.de/threads/3d-teile-und-zubeh%C3%B6r-f%C3%BCr-den-ardumower.22588/
Pictures
Tire mod with U-form rubber
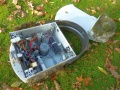
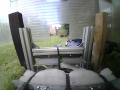
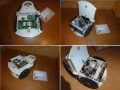
Inside (prototype)
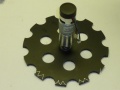
modified tire profile
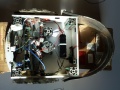
Inside (PCB)
'Off-road' tire mod using bicycle tube
Electronics box
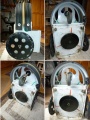
BumperDuino


Videos
- Ardumower rear/front driven climbing difference
- Ardumower rear-driven, BumperDuino demo
- pushcart tires
- Demo
- Optimized tires
- Bicycle tube tires for 'off-road'
Other ideas
rear driven (idea)
rear driven (experimental)
