Arduino first steps: Unterschied zwischen den Versionen
Aus www.wiki.ardumower.de
Autega (Diskussion | Beiträge) |
Gimate (Diskussion | Beiträge) |
||
| Zeile 15: | Zeile 15: | ||
File: Arduino atmega2560 usb connected.jpg|Arduino Mega 2560 connected via USB | File: Arduino atmega2560 usb connected.jpg|Arduino Mega 2560 connected via USB | ||
</gallery> | </gallery> | ||
| − | You may need to install a driver for your Arduino: | + | |
| + | If your Arduino is not recognised as an USB device after plug-in, try a different USB cable. | ||
| + | |||
| + | You may need to install a driver for your Arduino: | ||
* Arduino Nano: Click [http://forum.diamex.de/attachment.php?attachmentid=65&d=1346742303 here] to download 'FTDI CDM 2.08.24' | * Arduino Nano: Click [http://forum.diamex.de/attachment.php?attachmentid=65&d=1346742303 here] to download 'FTDI CDM 2.08.24' | ||
Note: Do NOT use the newest FTDI drivers as they may make your Arduino malfunction). Here are the steps to remove any newer driver: | Note: Do NOT use the newest FTDI drivers as they may make your Arduino malfunction). Here are the steps to remove any newer driver: | ||
Version vom 10. September 2016, 20:52 Uhr
If you have never worked with Arduino before, this page describes how to start with your Arduino that you can purchase via the shop ![]() .
.
All you need to run the example below is:
- One Arduino Nano (or Arduino Mega2560)
- One USB cable
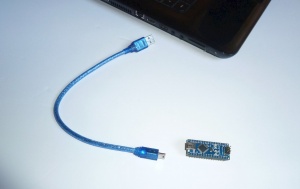

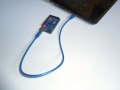
1. Attach the Arduino to your computer
Using an USB cable, attach the Arduino (Arduino Nano or Arduino Mega) to your computer as shown below.
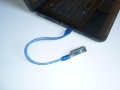
Arduino Nano connected via USB
Arduino Mega 2560 connected via USB


If your Arduino is not recognised as an USB device after plug-in, try a different USB cable.
You may need to install a driver for your Arduino:
- Arduino Nano: Click here to download 'FTDI CDM 2.08.24'
  Note: Do NOT use the newest FTDI drivers as they may make your Arduino malfunction). Here are the steps to remove any newer driver:
  1. In Windows, choose 'Computer->Properties->Extended system settings->Hardware device settings'
  2. Set 'Should Windows install drivers automatically?' to 'NO'
  3. Activate 'Never install drivers via Windows Update'
  4. Run CDM Uninstaller
  5. Click 'Add', then 'Remove Devices'
  6. Restart your computer
  7. Re-plug Arduino Nano, now Windows should ask for driver installation, and you can choose the correct driver version (2.08.24)
- Arduino Mega 2560:
  1. Download the Arduino development software (link in next section below) to your computer
  2. Navigate to and select the driver file named "arduino.inf", located in the "Drivers" folder of the Arduino Software download.
2. Download
Click here to download the Arduino development software (v1.6.3) to your computer
(Windows users should download the 'Installer' version on that page):

3. Install
After the download completed, install the Arduino development software on your computer:
For Windows users, double click the downloaded file ('arduino-1.6.3-windows.exe') in your
Windows file explorer to run the installation.
4. Run
After the installation completed, run the Arduino development software on your computer
by double clicking the 'Arduino' symbol on your Windows desktop.


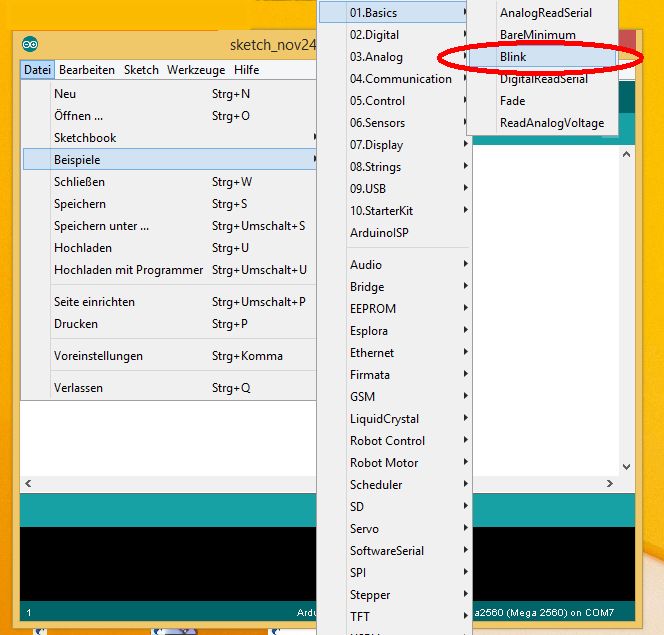
5. Choose blink example
After the Arduino development software has started, choose the menu,
and click on 'File->Examples->Basics->Blink'. This will load the Arduino blink example.

6. Choose correct board type
Via the menu, click on 'Tools->Board->Arduino Nano' to choose your Nano board
(or Arduino Mega 2560 if you want to use a Mega board).


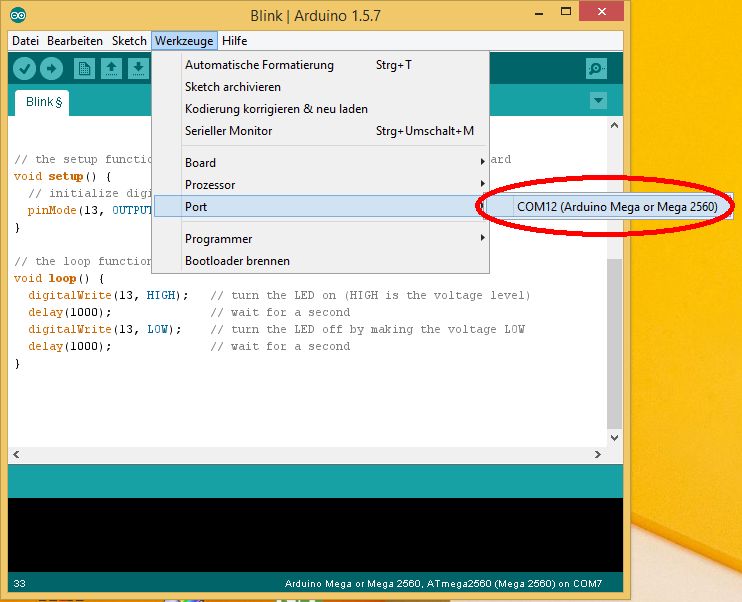
7. Choose correct USB serial port
Via the menu, click on 'Tools->Port', and choose the detected USB serial port.

8. Upload the blink example
Click on the 'Upload' symbol to upload the blink example to your Arduino.


After the code is uploaded, your Arduino will start to blink!

Congratulations!
You have just programmed your first Arduino!
Now let's look a little bit closer at the above blink code to understand it:
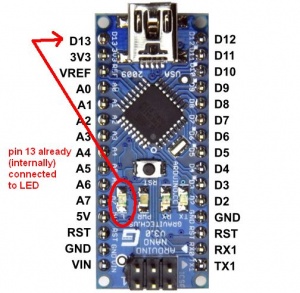
The Arduino has several pins, each of them has a number. As shown below, Pin 13 is already (internally) connected to the on-board LED:

Each pin can be configured as either INPUT or OUTPUT depending on wheter you want
to measure or control that pin :
 INPUT   means that you can read (or measure) that pin. The measurement can be either ON
 (there is voltage on that pin)  or OFF (there is no voltage on that pin).
OUTPUT means that you can write (or control) the voltage of that pin.
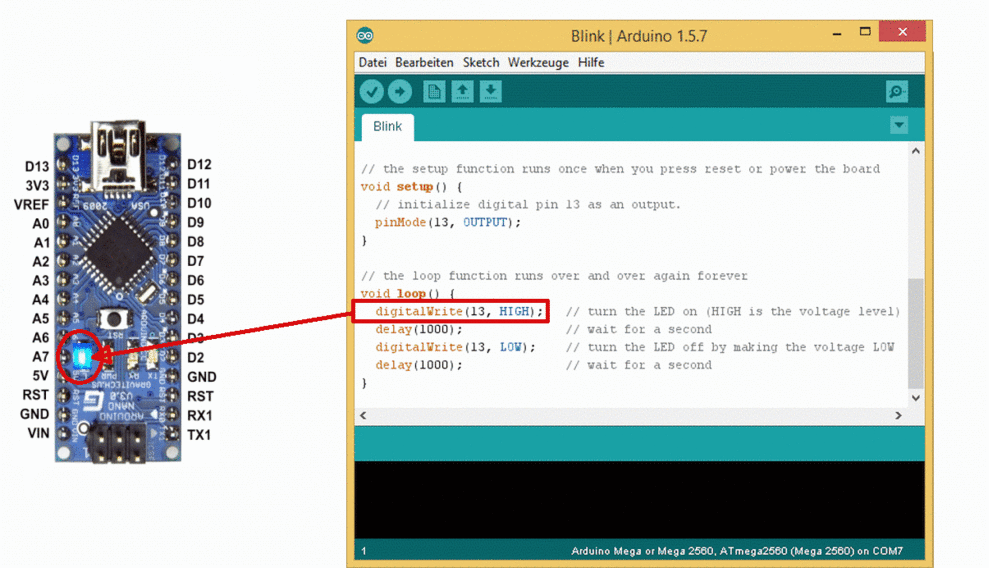
In the blink example above, we are using the LED pin (pin 13) that is already connected to an LED.
Because we want to control that pin, we are configuring it as OUTPUT:
pinMode(13, OUTPUT);
Now let's see how we can turn ON or OFF the LED using an Arduino command. This command will turn ON the voltage for pin 13:
digitalWrite(13, HIGH);
And consequently this command will turn OFF the voltage for pin 13:
digitalWrite(13, LOW);
Let's see how we can wait one second between the ON and OFF toggling. This command will wait (halt)
the program for one second (=1000 milliseconds):
delay(1000);
So let's look at the complete blink program again:
 void setup(){
   pinMode(13, OUTPUT);      // we want to control pin 13
 }

 void loop(){
   digitalWrite(13, HIGH);   // pin 13 will go HIGH (voltage ON)
   delay(1000);              // wait one second (=1000 milliseconds)
   digitalWrite(13, LOW);    // pin 13 wil go LOW (voltage OFF)
   delay(1000);              // wait one second (=1000 milliseconds)
   // ...now everything repeats
 }
How to go further...
Now you can try to upload the Ardumower code the same way as you uploaded the blink example!