Ardumower Sunray
Inhaltsverzeichnis
- 1 NOTE: everything here is still in development! Use Azurit firmware instead if you need a working firmware...
- 2 Significant changes compared to Azurit Firmware
- 3 Requirements
- 4 Code
- 5 IMU calibration
- 6 Compass calibration
- 7 User interface (for testing/development)
- 8 Error/pitfalls
- 9 Discussion / forum thread
NOTE: everything here is still in development! Use Azurit firmware instead if you need a working firmware...
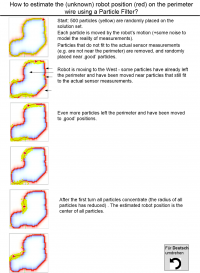
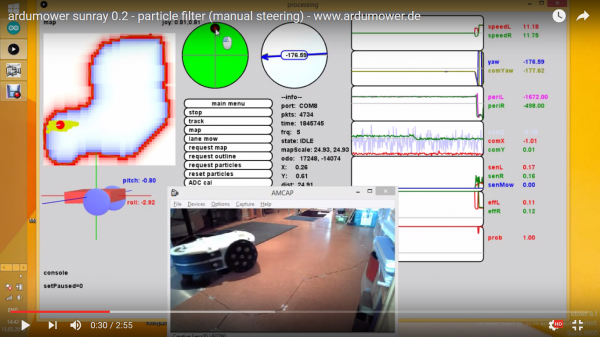
Ardumower Sunray is an alternative Firmware (experimental) for the Ardumower. It uses odometry, an IMU (gyro+compass) installed in a 'tower' and a perimeter to localize itself on the perimeter and within the perimeter. A particle filter estimates the robot position on a map based on moved distance and absolute angle.
Currently, a PC must be connected via Bluetooth to the robot to run the particle filter-based localization.
Demo video: https://www.youtube.com/watch?v=Ewqkd6leQjc
Significant changes compared to Azurit Firmware
- Optimized for PCB 1.3
- Optimized for Arduino Due (no longer sensor polling, individual pin interrupt handling, DMA transfers, flexible ADC sampling frequencies...)
- Optimized for slope and odometry (no longer imprecise time-based driving distances or rotations)
- Optimized for MPU6050 and DMP (digital motion processor)
Requirements
- Ardumower PCB 1.3 (incl. MC33926 motor drivers)
- Arduino Due
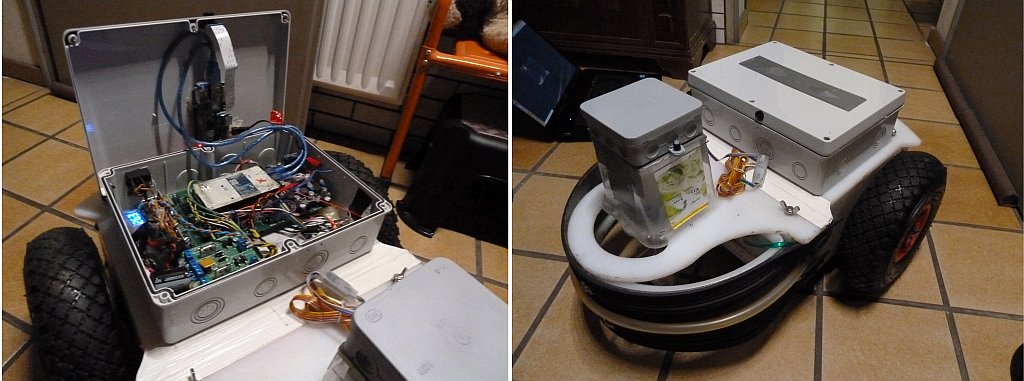
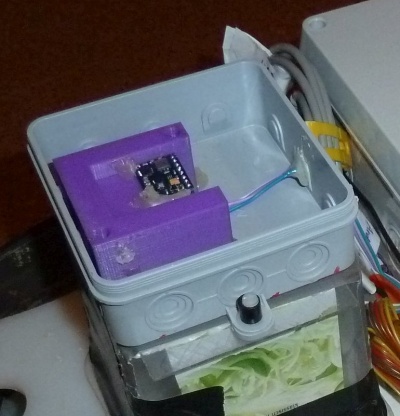
- IMU GY-88 (MPU6050, HMC5883L), installed on a 'tower', NOTE: you have to connect pin AD0 to 3V3 so the I2C address does not conflict with the RTC module
- 2 perimeter coils (left, right), Ardumower perimeter sender
- Ardumower motors using odometry
- Bluetooth module and a PC using an USB Bluetooth dongle (e.g. Delock EDR 150m)
Why Arduino Due? The Arduino Due has a DMA controller for ADC sampling without CPU interaction. Mapping and localization requires some working memory - Arduino Due has 96 KB SRAM for this task. Arduino Due supports flexible ADC sampling frequencies, spike filtering on I/O pins, I/O interrupts for all pins.
Why IMU GY-88? The MPU6050 has integrated sensor fusion (acc+gyro) via it's DMP (digital motion processor). Also, the MPU6050 gyro has a low measurement error (0.005 dps/sqrt, http://wiki.ardumower.de/index.php?title=IMU#Gyro)
Code
- Using Arduino IDE, flash the Sunray firmware onto your Arduino Due: https://github.com/Ardumower/Sunray (you may have to adjust serial ports in config.h).
- Install Processing (https://processing.org/download/).
- Using Processing, run 'processing_sunray' and verify that the bluetooth connection to the Firmware is working.
Bluetooth connection
On the PC, choose the COM port for your Bluetooth connection. In processing_mag.pde:
String serialport = "COM14";
IMU calibration
NOTE: It's recommended to skip this part until you have done the basic tests in 'processing_sunray' (see further below). Put or hold IMU in a straight position without pitch and roll. Run 'processing_sunray', and click on 'MPU selftest'. The displayed robot pitch and roll should now match the real robot pitch and roll.
Compass calibration
NOTE: It's recommended to skip this part until you have done the basic tests in 'processing_sunray' (see further below). Ardumower Sunray relies on a carefully-performed compass calibration, so it knows the robot's direction up to 3 degrees.
- Install IMU module 35cm away from metal parts (suggestion: use a 'tower' for it as you can see in the photos). Use 1m cable so you can move the module out of robot for calibration. Do no use metal parts (screws etc.) within 5cm of the module - use plastic screws. Fixate everything within 5cm of the module. A small movement of a cable etc. will make the calibration useless.
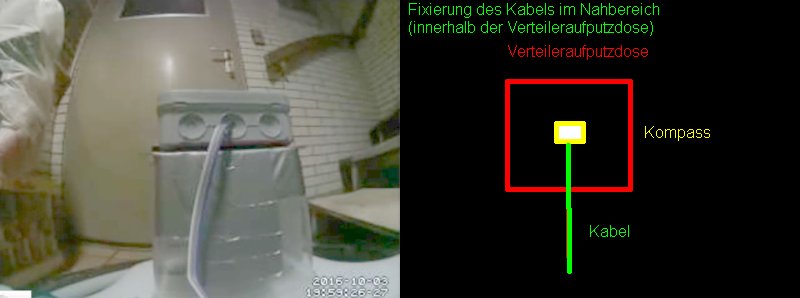
- Move IMU out of robot (so you can freely rotate the module without the robot) and power-on robot.
- On the PC, start 'processing_mag'.
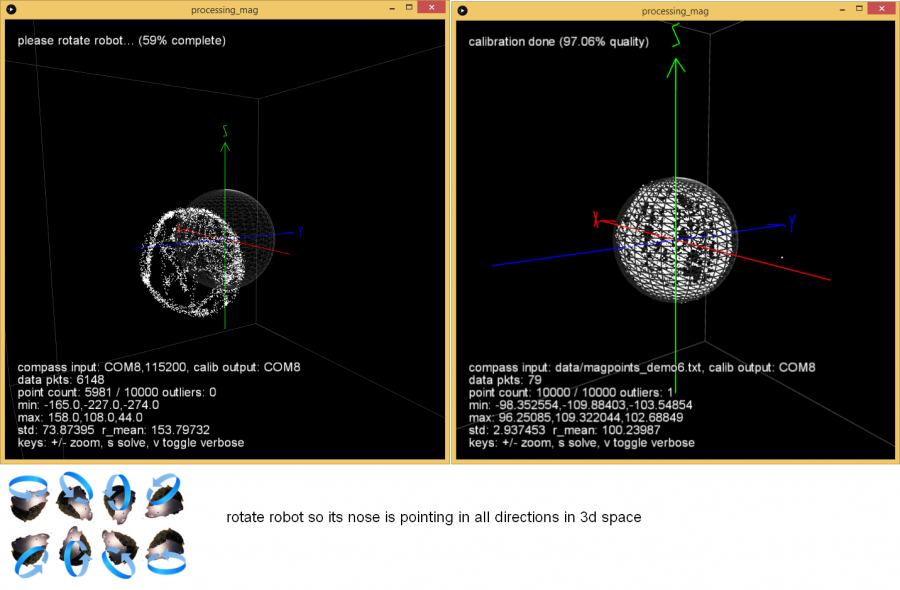
- Ensure there is at least >1m to all metal parts in the surrouding.
- Rotate IMU module slowly into all directions and collect > 20,000 measurements. Calibration ist performed and transmitted continously to robot (robot confirms with a tone).
- Install IMU module in the robot at least 35cm away from metal parts.
In the next section, we will verify compass yaw and gyro yaw are showing same values (up to 3 degree).
All ferromagnetic materials can have influcence on the compass:
- larger objects like motors, big screws etc. : big influence (keep 35 cm away)
- battery: small influence (keep 20cm away)
- thick wire: small influence (keep 20cm away)
- thin wire: small influence (keep 10cm away)
User interface (for testing/development)
- In 'processing_sunray.pde', setup Bluetooth port.
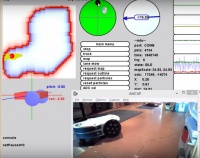
- On the PC, start 'processing_sunray'. The robot's sensors should be shown. At start (and every 3 minutes), the robot calibrates the Gyro and the IMU calibration status is shown in the user interface (the robot will make short buzzer beeps during gyro calibration time). After this is completed, you can verify the compass calibration by rotating the robot using the green joystick shown on the screen. Compass yaw and gyro yaw should be always the same (up to 3 degrees).
Test functions
Verify the the robot is moving correctly using these test functions. Click on one of the buttons in the user interface:
- line : robot should move on a straight line
- line rev : robot should move reverse on a straight line
- rotate +90deg : robot should rotate counter-clockwise 90 degree
Recording / Playback
You can record or playback all robot messages (e.g. to test the particle filter offline without robot). In processing_sunray.pde:
String logFile = "outdoor_mow_rand.log"; // if file exists, playback mode, otherwise record mode
There are sample files in the 'data' folder you can use for testing mapping and localization without a robot:
- outdoor_track.log (robot tracking a 120m perimeter)
- outdoor_mow_rand.log (robot randomly mowing inside a 120m perimeter with annotated ground truth)
Mapping
Before you can localize the robot on the map, the map needs to be generated. This is called mapping.
- On the PC start 'processing_sunray' and connect to robot via Bluetooth.
- Put robot on perimeter, as close as possible to charging station (for anti-clockwise tracking).
- On the PC, choose 'track anti-clockwise' and 'mapping is ON'.
- Let robot track perimeter until it returns at the other side of charging station.
- Press 'mapping is OFF'. The map will be generated and stored on the PC.
Localization
A particle filter will estimate the robot's position on the map (this is called localization). You can reset the particle filter at any time by clicking 'reset particles'. In perimeter tracking mode, slightly different particle filter parameters will be used than during ordinary mowing. You can set the robot's position manually (this is called kidnapping) by clicking on the map in the user interface. If you move the robot in the real world manually on the ground with your hands, this is kidnapping too, and the filter has to detect this situation and will reset automatically.
Random mowing
In random mowing mode, the robot will move until a sensor (perimeter, bumper etc.) triggers and then choose a random direction and continue.
- On the PC, choose 'mow rand'
Demo video: https://www.youtube.com/watch?v=tZMAjvR4nxU
Lane-by-lane mowing
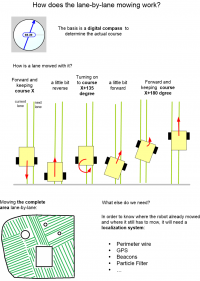
In lane-by-lane mode, the robot will move one lane until a sensor triggers, then enter the next lane and continue. NOTE: A strategy for mowing not-mowed areas on the map is not yet implemented.
- On the PC, choose 'mow lane'
Demo videos: https://www.youtube.com/watch?v=T0yondeM3fY, https://www.youtube.com/watch?v=c2DyrASeCqc
Perimeter tracking
The particle filter will estimate the robot's position on the perimeter while tracking.
- On the PC, choose 'track'
Demo video: https://www.youtube.com/watch?v=rNuw9vNcYpM
Particle filter tuning
The particle filter can be tuned in map.pde where you can set steering and distance noise for the particles:
 public static final float steeringNoise = 0.5;
 public static final float distanceNoise = 0.05;
Docking
While in perimeter tracking mode, the robot will stop immediately after seeing voltage at its charging pins and start charging.
Demo video: https://www.youtube.com/watch?v=4vETdc6Ba7E
Stuck detection
Direction change is measured via (1) odometry and (2) gyro and both are compared to detect a tire stuck. Additionally, (1) set angle and (2) current angle of direction PID controller are compared to detect a tire stuck.
Demo Video: https://www.youtube.com/watch?v=ka2oNM90DKg
Error/pitfalls
frq counter: if 'frq' counter is decreasing significantly, check I2C cables
Discussion / forum thread
http://www.ardumower.de/index.php/de/forum/software/827-ardumower-software-sunray
