Alfred Assembly: Unterschied zwischen den Versionen
(→Programming your Alfred MCU firmware) |
(→Programming your Alfred MCU firmware) |
||
| Zeile 49: | Zeile 49: | ||
5. Restart the App and verify that the 'MCU firmware' is shown: | 5. Restart the App and verify that the 'MCU firmware' is shown: | ||
| + | |||
| + | <gallery> | ||
| + | File: Alfred_mcu_firmware_ver.png | ||
| + | </gallery> | ||
Version vom 17. Mai 2023, 10:17 Uhr
This page describes the assembly of the Alfrd DIY kit that you can purchase via the [1] ![]() .
.
Inhaltsverzeichnis
Videos
- Alfred DIY - Montage des Bedienpanels
- Montage der RTK Basisstation | Assembly of RTK base | ArduMower / Alfred
Assembly of the LED-Board

Alfred_LED_Board 1
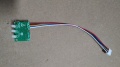
Alfred_LED_Board 2
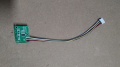
Alfred_LED_Board 3


Connection of electricity thieves
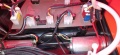
Alfred_ElectricityThieves 1

Alfred_ElectricityThieves 2


The enclosed electricity thieves are to divert the supply voltage from Alfred. Please press the black cable (-) to the black cable from the red connector (battery cable) and the red cable (+) to the black cable from the blue connector (on/off switch).
Remaining ribbon cable from the control panel
You can remove or cut off the two remaining ribbon cables on the original control panel, insulate the ends and stow them in the housing.
Programming your Alfred MCU firmware
1. Connect the Alfred PCB ribbon cable to the robot MCU (cable 2).

2. Download the Sunray Manual and install the App as described in the Sunray manual.
3. Via the App, connect with the Alfred PCB (either Bluetooth or WiFi). Once connected to the Alfred PCB, the Sunray App will show a default voltage ('28v').
4. Choose 'Menu->Firmware->Apply Update' to flash the Alfred MCU firmware (NOTE: this process will take 2-3 minutes).
5. Restart the App and verify that the 'MCU firmware' is shown:
