Bluetooth: Unterschied zwischen den Versionen
(→Steps) |
|||
| Zeile 6: | Zeile 6: | ||
On the phone, you'll need the App [https://play.google.com/store/apps/details?id=de.grauonline.arduremote 'ArduRemote']. Alternatively, you can use the App [https://play.google.com/store/apps/details?id=au.com.forward.pfodApp 'pfodApp']. | On the phone, you'll need the App [https://play.google.com/store/apps/details?id=de.grauonline.arduremote 'ArduRemote']. Alternatively, you can use the App [https://play.google.com/store/apps/details?id=au.com.forward.pfodApp 'pfodApp']. | ||
| − | The | + | The application menu includes: |
* Status information (battery voltage, charging current etc.) | * Status information (battery voltage, charging current etc.) | ||
* Settings (Timer etc.) | * Settings (Timer etc.) | ||
| Zeile 35: | Zeile 35: | ||
The Bluetooth Module will run at 3.3V, you need a voltage divider for RX line and an Pullup Resistor for the TX Line, like showing in Circuit. | The Bluetooth Module will run at 3.3V, you need a voltage divider for RX line and an Pullup Resistor for the TX Line, like showing in Circuit. | ||
| − | For | + | For programming the Module, you must connect the Key Pin from the BT Module, to the 3,3 V from the Arduino (using jumper JP2) and disconect after. |
on the arduino console : press 'd' to enter menu and use option 3 to 'set up BT module config'. | on the arduino console : press 'd' to enter menu and use option 3 to 'set up BT module config'. | ||
| Zeile 43: | Zeile 43: | ||
## for HC06/linvor: Do NOT pair/connect (LED must be blinking) | ## for HC06/linvor: Do NOT pair/connect (LED must be blinking) | ||
## for FBT06/MBTV4: First you have to solder the PIO11 pin to VCC (PIN 12) which is 3.3 Volts using a thin wire. | ## for FBT06/MBTV4: First you have to solder the PIO11 pin to VCC (PIN 12) which is 3.3 Volts using a thin wire. | ||
| − | # Baud rate: Bluetooth module and Arduino Mega must use the same baud rate (19200) - The baud rate of the BT module can be changed via Ardumower serial console. Connect Ardumower Mega board to your PC (USB), enter the serial console in the Arduino IDE (CTRL+M), and choose baud rate 19200, then choose 'd' to enter the Ardumower menu to configure the module | + | # Baud rate: Bluetooth module and Arduino Mega must use the same baud rate (19200) - The baud rate of the BT module can be changed via Ardumower serial console. Connect Ardumower Mega board to your PC (USB), enter the serial console in the Arduino IDE (CTRL+M), and choose baud rate 19200, then choose 'd' to enter the Ardumower menu to configure the module (option 3 configure the BT module). |
# Restart: After your BT module is configured successfully, remove KEY pin connection again (HC05), and restart module. | # Restart: After your BT module is configured successfully, remove KEY pin connection again (HC05), and restart module. | ||
# Pairing: The BT module must be 'paired' with your Android device once (via Android device settings). On the Android device, choose symbol "Settings" (via Android menu). Now choose "Wireless and Networks->Bluetooth Settings" and "Find device". Finally, choose "pair with this device" and enter your pin (very often "1234"). The Bluetooth module should now appear as "paired". | # Pairing: The BT module must be 'paired' with your Android device once (via Android device settings). On the Android device, choose symbol "Settings" (via Android menu). Now choose "Wireless and Networks->Bluetooth Settings" and "Find device". Finally, choose "pair with this device" and enter your pin (very often "1234"). The Bluetooth module should now appear as "paired". | ||
| Zeile 49: | Zeile 49: | ||
| − | Nota : If you experience difficulties to configure baud rate (step2), you can alternatively press the little switch on your BT module while powering up this will automatically set baud rate to 38400. then you can use option 3 of Ardumower menu to configure BT module (set name, pin code etc...). | + | Nota : If you experience difficulties to configure baud rate (step2), you can alternatively press the little switch on your BT module while powering up this will automatically set baud rate to 38400. then you can use option 3 of Ardumower menu to configure BT module (set name, pin code etc...). Detail information on configuring the BT module available here [http://www.martyncurrey.com/arduino-with-hc-05-bluetooth-module-at-mode/] |
| − | Nota : When | + | Nota : When you enter in menu mode (ardumower console press 'd'), you may experience timeout from bluetooth app. you need to exit from the menu for the robot to interact with your app (phone or tablet) |
=Communication protocol= | =Communication protocol= | ||
Version vom 28. November 2015, 16:25 Uhr
Inhaltsverzeichnis
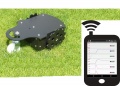
Abstract
The Ardumower can be monitored and controlled wirelessly:
- via phone/tablet (Android App)
- via USB Bluetooth dongle (PC serial console)
On the phone, you'll need the App 'ArduRemote'. Alternatively, you can use the App 'pfodApp'.
The application menu includes:
- Status information (battery voltage, charging current etc.)
- Settings (Timer etc.)
- Calibration (Motor, IMU etc.)
- Remote control (Start/Stop, Switching on/off mower motor, blade modulation etc.)
Live configuration, monitoring and debugging
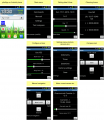
Android app menus

Android app (pfodApp)

Android app (ArduRemote)
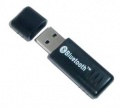
PC communication via Bluetooth USB dongle


Bluetooth module
On the robot, you'll need a Bluetooth module supporting Bluetooth Serial Port Profile (SPP). SPP uses Bluetooth Service Discovery Protocol (SDP) and the RFCOMM protocol. Depending on the desired range, you can use different Bluetooth classes:
- Bluetooth class 2 (up to approx. 50m range), e.g. HC03/04/05/06
- Bluetooth class 1 (up to approx. 100m range), e.g. BTM220, requires additional circuit
Bluetooth HC-05
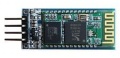
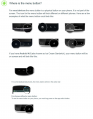
HC-05 module
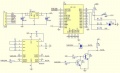
HC-05 schematics


The Bluetooth Module will run at 3.3V, you need a voltage divider for RX line and an Pullup Resistor for the TX Line, like showing in Circuit.
For programming the Module, you must connect the Key Pin from the BT Module, to the 3,3 V from the Arduino (using jumper JP2) and disconect after. on the arduino console : press 'd' to enter menu and use option 3 to 'set up BT module config'.
Steps
- Configuration mode: The Bluetooth module must be in configuration mode for the next step:
- for HC05: Connect KEY pin to 3.3V after powering on the module (use jumper JP2)
- for HC06/linvor: Do NOT pair/connect (LED must be blinking)
- for FBT06/MBTV4: First you have to solder the PIO11 pin to VCC (PIN 12) which is 3.3 Volts using a thin wire.
- Baud rate: Bluetooth module and Arduino Mega must use the same baud rate (19200) - The baud rate of the BT module can be changed via Ardumower serial console. Connect Ardumower Mega board to your PC (USB), enter the serial console in the Arduino IDE (CTRL+M), and choose baud rate 19200, then choose 'd' to enter the Ardumower menu to configure the module (option 3 configure the BT module).
- Restart: After your BT module is configured successfully, remove KEY pin connection again (HC05), and restart module.
- Pairing: The BT module must be 'paired' with your Android device once (via Android device settings). On the Android device, choose symbol "Settings" (via Android menu). Now choose "Wireless and Networks->Bluetooth Settings" and "Find device". Finally, choose "pair with this device" and enter your pin (very often "1234"). The Bluetooth module should now appear as "paired".
- pfodApp: Now you can start pfodApp/ArduRemote to connect to the Ardumower.
Nota : If you experience difficulties to configure baud rate (step2), you can alternatively press the little switch on your BT module while powering up this will automatically set baud rate to 38400. then you can use option 3 of Ardumower menu to configure BT module (set name, pin code etc...). Detail information on configuring the BT module available here [1]
Nota : When you enter in menu mode (ardumower console press 'd'), you may experience timeout from bluetooth app. you need to exit from the menu for the robot to interact with your app (phone or tablet)
Communication protocol
The communication protocol between robot and Android app (the 'pfodSpecification') is defined here: http://www.forward.com.au/pfod/.
All menus (menu items, sliders, buttons) are created inside the robot. The App only visualizes the created menus, and sends back a command if a menu item was clicked by the user.
Example communication:
1. App requests main menu: {.}
2. Robot sends main menu to App: {.title`1000|key1~text1|key2~text2|key3~text3}
   The App will visualize the main menu like this:
   title
   [text1]
   [text2]
   [text3]
3. User clicks menu item 'text1', App sends back to robot the corresponding command: {key1}
You can log the communication to a file (folder 'pfodAppRawData' or 'ArduRemote') on your Android device. For the ArduRemote, press the 'Android menu button' on your device and choose 'Enable logging'.
Android menu button
