Bluetooth ru
Inhaltsverzeichnis
Описание
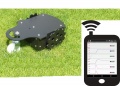
Ardumower может выводить данные и управляться через Bluetooth канал связи:
- через смартфон/планшет (Android-приложения)
- через USB Bluetooth-свисток (с компьютера)
Для управления с Андроид-устройств вам необходима специальная программа 'pfodApp' или альтернативная 'ArduRemote'.
Управляющее меню включает в себя:
- Текущее состояние (напряжение батареи, ток зарядки и т.д.)
- Настройки платформы
- Калибровка (вращение двигателей, гироскоп и т.д.)
- Удаленное управление (Старт/стоп, повороты, включение-выключение ножей и т.д.)
Настройка и отладка
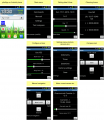
Android-меню

Android приложение pfodApp

Android приложение ArduRemote
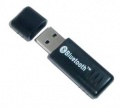
Bluetooth-свисток для подключения к компьютеру


Bluetooth-модуль
Для робота вам необходим Bluetooth-модуль, поддерживающий Bluetooth Serial Port Profile (SPP). SPP используется Bluetooth Service Discovery Protocol (SDP) и протоколом RFCOMM. В зависимости от требуемого расстояния можно использовать следующие устройства Bluetooth:
- Bluetooth класс 2 (расстояние до 50 метров), модули HC03/04/05/06
- Bluetooth класс 1 (расстояние до 100 метров), модуль BTM220 (требует дополнительную обвязку)
Bluetooth-модуль HC-05
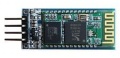
Модуль HC-05
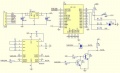
Схема HC-05


Модуль HC-05 (на картинке зеленая часть) использует 3.3 вольта, поэтому нужно приобрести с уже распаянным делителем напряжения и обвязкой (основная синяя платка). Если же у вас только зеленый модуль, то для линий RX и TX нужно использовать делители напряжения на резисторах, так как показано на рисунке со схемой.
Для настройки модуля (ПИН-код для подключения, скорость порта и т.д.) необходимо подключить контакт KEY на модуле к шине питания +3.3 вольта и после операции настройки отключить (*unlogic: лично я этот метод впервые здесь увидел, я подпаивал проводок к контакту 34, примерно так).
На плате для этого выведен специальный джампер JP2 - "KEY".
Steps
- Configuration mode: The Bluetooth module must be in configuration mode for the next step:
- for HC05: Connect KEY pin to 3.3V after powering on the module
- for HC06/linvor: Do NOT pair/connect (LED must be blinking)
- for FBT06/MBTV4: First you have to solder the PIO11 pin to VCC (PIN 12) which is 3.3 Volts using a thin wire.
- Baud rate: Blueooth module and Arduino Mega must use the same baud rate (19200) - The baud rate of the BT module can be changed via Ardumower serial console. Connect Ardumower Mega board to your PC (USB), enter the serial console in the Arduino IDE (CTRL+M), and choose baud rate 19200, then choose 'd' to enter the Ardumower menu to configure the module to the correct baud rate.
- Restart: After your BT module is configured successfully, remove KEY pin connection again (HC05), and restart module.
- Pairing: The BT module must be 'paired' with your Android device once (via Android device settings). On the Android device, choose symbol "Settings" (via Android menu). Now choose "Wirless and Networks->Bluetooth Settings" and "Find device". Finally, choose "pair with this device" and enter your pin (very often "1234"). The Bluetooth module should now appear as "paired".
- pfodApp: Now you can start pfodApp/ArduRemote to connect to the Ardumower.
Communication protocol
The communication protocol between robot and Android app (the 'pfodSpecification') is defined here: http://www.forward.com.au/pfod/.
All menus (menu items, sliders, buttons) are created inside the robot. The App only visualizes the created menus, and sends back a command if a menu item was clicked by the user.
Example communication:
1. App requests main menu: {.}
2. Robot sends main menu to App: {.title`1000|key1~text1|key2~text2|key3~text3}
   The App will visualize the main menu like this:
   title
   [text1]
   [text2]
   [text3]
3. User clicks menu item 'text1', App sends back to robot the corresponding command: {key1}
You can log the communication to a file (folder 'pfodAppRawData' or 'ArduRemote') on your Android device. For the ArduRemote, press the 'Android menu button' on your device and choose 'Enable logging'.
Кнопки меню в смартфонах Android
