Bluetooth und App: Unterschied zwischen den Versionen
(→Bluetooth HC-05) |
(→Schritte) |
||
| Zeile 37: | Zeile 37: | ||
Zur Programmierung wird der Key-Pin des BT-Modules mit 3,3V vom Arduino verbunden und danach die Verbindung wieder getrennt. | Zur Programmierung wird der Key-Pin des BT-Modules mit 3,3V vom Arduino verbunden und danach die Verbindung wieder getrennt. | ||
| − | =Schritte= | + | =Die Schritte im Einzelnen= |
| − | # | + | # Konfigurationsmodus: Das Bluetooth-Modul muss für die nächsten Schritte im Konfigurationsmodus sein: |
| − | ## | + | ## für HC05: Nachdem das Modul an die Betriebsspannung angeschlossen wurde, verbinde den KEY-Pin mit 3,3V |
| − | ## | + | ## für HC06/linvor: nicht paaren/verbinden (LED muss blinken) |
| − | ## | + | ## für FBT06/MBTV4: Zuerst muss ein dünner Draht von Pin PIO11 nach VCC (PIN 12)das sind 3.3 Volt gelötet werden. |
| − | # | + | # Baudrate: Das Bluetooth-Modul und der Arduino Mega müssen die gleiche Baudrate (19200) verwenden - Die Baudrate des Bluetooth-Modules kann über die serielle Konsole des Ardumowers geändert werden. Verbinde das Ardumower Mega Board mit deinem PC (USB), gehe in die serielle Konsole in der Arduino IDE (Strg+M), und wähle dort Baudrate 19200, dann drücke Taste 'd' um ins Ardumower-Menü zu gelangen um hier die richtige Baudrate für das BT-Modul einzustellen. |
| − | # | + | # Neustart: Nachdem das BT-Modul erfolgreich konfiguriert wurde, muss die Verbindung des KEY-Pins zu 3,3V wieder getrennt werden (HC05). Danach startet man das Modul neu. |
| − | # Pairing: | + | # Pairing: Das BT-Modul muss dem Handy oder Tablet (über Android/Einstellungen) bekanntgemacht werden. Diesen Vorgang nennt man Pairing. Wähle auf dem Android-Gerät das Symbol "Einstellungen" (über Android Menü). Nun wähle "Drahtlos und Netzwerke/Bluetooth->Bluetooth Einstellungen" und "Finde Gerät(Scannen)". Wurde der Ardumower in der Liste der gefundenen Geräte angezeigt, wählt man ihn aus und sagt dann -verbinden-. Nach der Eingabe der Sicherheits-PIN (als Vorgabe "1234"), sollte das Bluetooth-Modul des Arduino mit dem Handy gepaart sein (paired). |
| − | # pfodApp: | + | # pfodApp: Jetzt kann die APP pfodApp/ArduRemote gestartet werden und sich mit dem Ardumower verbinden. |
=Kommunikation-Protokoll= | =Kommunikation-Protokoll= | ||
Version vom 8. Juli 2015, 12:12 Uhr
Inhaltsverzeichnis
Zusammenfassung
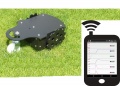
Der Ardumower kann drahtlos überwacht und gesteuert werden:
- über Handy/Tablet (Android App)
- über USB Bluetooth Dongle (PC serial console)
Auf den Handy/Tablet benötigst du folgende App 'pfodApp'. alternativ kannst du diese App benutzen 'ArduRemote'.
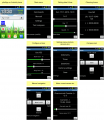
Das Handy-Menü enthält:
- Statusinformationen (Akku-Spannungg, Ladestrom usw.)
- Einstellungen (Timer usw.)
- Abgleich (Motor, IMU etc.)
- Fernsteuerung (Start/Stop, Ein/Aus Mähmotor, Messermodulation usw.)
Live-Konfiguration, Überwachung und Fehlersuche
Android App Menü

Android App (pfodApp)

Android App (ArduRemote)
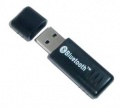
PC-Kommunikation über Bluetooth USB Dongle


Bluetooth Module
Der Roboter benötigt ein Bluetooth-Modul das das Serial Port Profil (SPP) unterstützt. SPP verwendet das Bluetooth Service Discovery Protocol (SDP) und das RFCOMM protocol. Abhängig von der gefoderten Reichweite kann man unterschiedliche Bluetooth-Klassen verwenden:
- Bluetooth class 2 (bis ca. 50m Reichweite), z.B. HC03/04/05/06
- Bluetooth class 1 (bis ca. 100m Reichweite), z.B. BTM220, erfordert eine Zusatzschaltung
Bluetooth HC-05
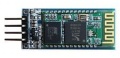
HC-05 Modul
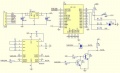
HC-05 Schaltung


Das Bluetooth-Modul wird mit 3,3V betrieben. Man benötigt deshalb einen Spannungsteiler an der RX-Leitung und einen PullUp-Widerstand an der TX-Leitung so, wie es in der Schaltung zu sehen ist.
Zur Programmierung wird der Key-Pin des BT-Modules mit 3,3V vom Arduino verbunden und danach die Verbindung wieder getrennt.
Die Schritte im Einzelnen
- Konfigurationsmodus: Das Bluetooth-Modul muss für die nächsten Schritte im Konfigurationsmodus sein:
- für HC05: Nachdem das Modul an die Betriebsspannung angeschlossen wurde, verbinde den KEY-Pin mit 3,3V
- für HC06/linvor: nicht paaren/verbinden (LED muss blinken)
- für FBT06/MBTV4: Zuerst muss ein dünner Draht von Pin PIO11 nach VCC (PIN 12)das sind 3.3 Volt gelötet werden.
- Baudrate: Das Bluetooth-Modul und der Arduino Mega müssen die gleiche Baudrate (19200) verwenden - Die Baudrate des Bluetooth-Modules kann über die serielle Konsole des Ardumowers geändert werden. Verbinde das Ardumower Mega Board mit deinem PC (USB), gehe in die serielle Konsole in der Arduino IDE (Strg+M), und wähle dort Baudrate 19200, dann drücke Taste 'd' um ins Ardumower-Menü zu gelangen um hier die richtige Baudrate für das BT-Modul einzustellen.
- Neustart: Nachdem das BT-Modul erfolgreich konfiguriert wurde, muss die Verbindung des KEY-Pins zu 3,3V wieder getrennt werden (HC05). Danach startet man das Modul neu.
- Pairing: Das BT-Modul muss dem Handy oder Tablet (über Android/Einstellungen) bekanntgemacht werden. Diesen Vorgang nennt man Pairing. Wähle auf dem Android-Gerät das Symbol "Einstellungen" (über Android Menü). Nun wähle "Drahtlos und Netzwerke/Bluetooth->Bluetooth Einstellungen" und "Finde Gerät(Scannen)". Wurde der Ardumower in der Liste der gefundenen Geräte angezeigt, wählt man ihn aus und sagt dann -verbinden-. Nach der Eingabe der Sicherheits-PIN (als Vorgabe "1234"), sollte das Bluetooth-Modul des Arduino mit dem Handy gepaart sein (paired).
- pfodApp: Jetzt kann die APP pfodApp/ArduRemote gestartet werden und sich mit dem Ardumower verbinden.
Kommunikation-Protokoll
The communication protocol between robot and Android app (the 'pfodSpecification') is defined here: http://www.forward.com.au/pfod/.
All menus (menu items, sliders, buttons) are created inside the robot. The App only visualizes the created menus, and sends back a command if a menu item was clicked by the user.
Example communication:
1. App requests main menu: {.}
2. Robot sends main menu to App: {.title`1000|key1~text1|key2~text2|key3~text3}
   The App will visualize the main menu like this:
   title
   [text1]
   [text2]
   [text3]
3. User clicks menu item 'text1', App sends back to robot the corresponding command: {key1}
You can log the communication to a file (folder 'pfodAppRawData' or 'ArduRemote') on your Android device. For the ArduRemote, press the 'Android menu button' on your device and choose 'Enable logging'.
Android menu button
