Bumper sensor: Unterschied zwischen den Versionen
Aus www.wiki.ardumower.de
(→Code) |
BenPan (Diskussion | Beiträge) (→Schematics) |
||
| (8 dazwischenliegende Versionen von 2 Benutzern werden nicht angezeigt) | |||
| Zeile 1: | Zeile 1: | ||
=Abstract= | =Abstract= | ||
| + | |||
| + | [[File: Ardumower_BumperDuino.jpg | 400px]] | ||
| + | |||
Ardumower's bumper sensor (called 'BumperDuino') is based on a pressure sensor and helps us to detect obstacles. | Ardumower's bumper sensor (called 'BumperDuino') is based on a pressure sensor and helps us to detect obstacles. | ||
| Zeile 5: | Zeile 8: | ||
<gallery> | <gallery> | ||
| − | |||
File: Ardumower_bumperduino_outdoor.jpg | BumperDuino pressure sensor tube | File: Ardumower_bumperduino_outdoor.jpg | BumperDuino pressure sensor tube | ||
| + | File: bumperduino_ardumower.jpg | ||
File: Bumperduino_example.jpg | BumperDuino example | File: Bumperduino_example.jpg | BumperDuino example | ||
File: Bumperduino_pressure_sensor.jpg | BumperDuino pressure sensor tube | File: Bumperduino_pressure_sensor.jpg | BumperDuino pressure sensor tube | ||
| Zeile 20: | Zeile 23: | ||
</gallery> | </gallery> | ||
| − | #[https://github.com/Ardumower/ardumower/ | + | #[https://github.com/Ardumower/ardumower/blob/master/pcb/Produzierte_Platinen/BumperDuino%20PCB/BumperDuinoSCH.pdf Schematics] |
| − | + | ||
=Code= | =Code= | ||
| − | You can download the Arduino Code [https://github.com/Ardumower/ardumower/ | + | You can download the Arduino Code [https://github.com/Ardumower/ardumower/blob/master/code/BumperDuino/ here]. Important: Choose 'Arduino Uno' as bootloader. |
To upload the code, set jumper to 'VUSB' and connect an USB-TTL adapter to J4 (USB-LIGHT) as follows: | To upload the code, set jumper to 'VUSB' and connect an USB-TTL adapter to J4 (USB-LIGHT) as follows: | ||
| Zeile 40: | Zeile 42: | ||
</gallery> | </gallery> | ||
| − | All steps are described in more detail here: [https://github.com/Ardumower/ardumower/blob/master/Dokumentation/ | + | All steps are described in more detail here: [https://github.com/Ardumower/ardumower/blob/master/Dokumentation/BumperDuino/Workshop%20BumperDuino.pdf FT232RL USB-adapter manual]. |
=Connecting to Ardumower= | =Connecting to Ardumower= | ||
Set jumper to 'VIN', and connect VIN and BUMPER-OC to Ardumower as follows: | Set jumper to 'VIN', and connect VIN and BUMPER-OC to Ardumower as follows: | ||
| − | VIN | + | BumperDuino VIN + -- PCB1.3 +9V |
| − | + | BumperDuino VIN - -- PCB1.3 P11 GND (2) | |
| − | + | BumperDuino OC DC1 -- PCB1.3 P11 pinBumperRight (3) | |
| − | + | BumperDuino OC DC2 -- PCB1.3 P11 pinBumperLeft (4) | |
| − | + | ||
| − | + | ||
| − | DC2 -- | + | |
=Videos= | =Videos= | ||
#[https://www.youtube.com/watch?v=IW93kSheB68 Introduction BumperDuino] | #[https://www.youtube.com/watch?v=IW93kSheB68 Introduction BumperDuino] | ||
#[https://www.youtube.com/watch?v=Crvdqs4AtvQ Making Of BumperDuino] | #[https://www.youtube.com/watch?v=Crvdqs4AtvQ Making Of BumperDuino] | ||
| + | #[https://www.youtube.com/watch?v=xRFrf5Aghkk&feature=youtu.be Neue BumperDuino Version mit Unterfahrschutz] | ||
| + | |||
| + | =BumperDuino and tilt protection= | ||
| + | The BumperDuino is permanently improved. Here you can find a version including tilt protection: | ||
| + | |||
| + | [http://www.ardumower.de/index.php/de/forum/dein-projekt-your-project/782-juergen-s-bumper-duino-board?start=40#11705 BumperDuino using tilt protection] | ||
| + | |||
| + | |||
| + | [[File: Bumperduino_tilt.jpg]] | ||
| + | |||
| + | =Forum discussions= | ||
| + | http://www.ardumower.de/index.php/de/forum/dein-projekt-your-project/782-juergen-s-bumper-duino-board?limitstart=0#8123 | ||
Aktuelle Version vom 30. Dezember 2021, 00:30 Uhr
Inhaltsverzeichnis
Abstract
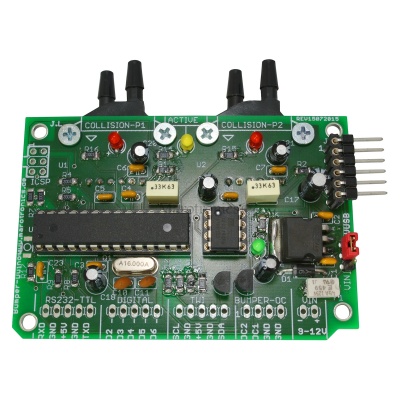
Ardumower's bumper sensor (called 'BumperDuino') is based on a pressure sensor and helps us to detect obstacles.
The PCB module and sensor can be purchased as complete kit via the shop ![]() .
.
Building instructions
Building instructions as well as instructions for programming the Arduino can be found in the BumperDuino manual.
Schematics
Code
You can download the Arduino Code here. Important: Choose 'Arduino Uno' as bootloader.
To upload the code, set jumper to 'VUSB' and connect an USB-TTL adapter to J4 (USB-LIGHT) as follows:
J4 (USB-LIGHT)
1 -- USB-TTL GND
2 -- not used
3 -- USB-TTL +5V
4 -- USB-TTL TX
5 -- USB-TTL RX
6 -- USB-TTL DTR (reset)
All steps are described in more detail here: FT232RL USB-adapter manual.
Connecting to Ardumower
Set jumper to 'VIN', and connect VIN and BUMPER-OC to Ardumower as follows:
BumperDuino VIN +    -- PCB1.3 +9V
BumperDuino VIN -    -- PCB1.3 P11 GND            (2)
BumperDuino OC DC1   -- PCB1.3 P11 pinBumperRight (3)
BumperDuino OC DC2   -- PCB1.3 P11 pinBumperLeft  (4)
Videos
BumperDuino and tilt protection
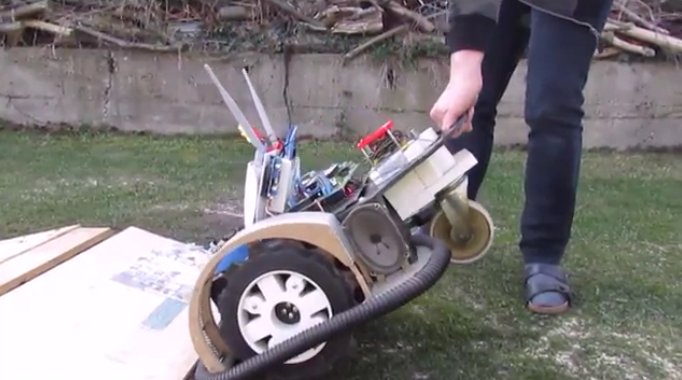
The BumperDuino is permanently improved. Here you can find a version including tilt protection:
BumperDuino using tilt protection


