Charging ru
Inhaltsverzeichnis
Основной принцип
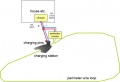
С помощью проволочной петли по периметру робот находит свою зарядную станцию, где он может быть заряжен снова. Он едет по проводу периметра (по часовой стрелке) до тех пор, пока не обнаружит напряжение на своих зарядных контактах. Там робот останавливается и заряжает батарею.
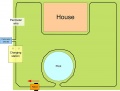
Схема провода периметра от зарядной станции
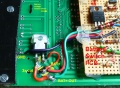
Компоненты станции
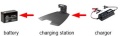
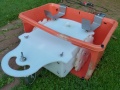
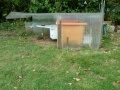
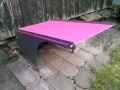
Зарядная станция
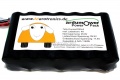
Батарея Sony Konion 7S2P (29.4V, 4500 mAh)


Charger
For the charger, we are using a Lithium Ion e-bike charger (29.4V, 1.5A current limitting) that can be purchased via the shop ![]() . The charger is placed in a protected area (house etc.) and connected to the robot charging station. The charger should accomplish the following things (in this case Lithium-Ion, lead battery is similar, but less critical):
. The charger is placed in a protected area (house etc.) and connected to the robot charging station. The charger should accomplish the following things (in this case Lithium-Ion, lead battery is similar, but less critical):
- Charge battery pack via the charging pins of the robot
- Maximum cutoff voltage / charge voltage compliance (charging voltage limit)
- Maximum charging current compliance (charging current limit)
If you are using an existing charger, these things are implemented with high probability already in it.
Расчет общей мощности
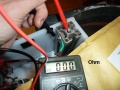
- 2 моторедуктора, под нагрузкой каждый по 2A, 27 вольт (измерено при 80% ШИМ).
- 1 х двигатель косилки, под нагрузкой 1A, 27 вольт (измерено при 80% ШИМ).
- Печатная плата: 1A, 5 вольт (среднепотолочное)
Всего: 3A * 27В + 1A * 5В = 81W + 5W = 86W
Батарея
Мы используем батарею "Sony Konion 7S2P" из 8 литий-ионных аккумуляторов (Sony Konion US18650V3 2250 mAh cells, Li-Mn), 29.4 в x 4500 мАч = 132 Вт * ч, 500 циклов перезарядки, 126 х 36 х 65 мм.
Используя эту батарею с моторами Ardumower время скашивания составляет около 1,5 часов (132 Вт · ч / 86W).
Условия заряда/разряда этого аккумулятора для оптимального времени жизни батареи:
- Зарядки каждой ячейки: макс 4.15v (0.3A - 0.1A зарядки Cutt-офф)
- Разрядки каждой ячейки: мин 3.1V
Standby-off / Under-voltage protection
There are two reasons for a battery switch (standby-off mechanism):
Reason1: If the robot was not started within 5 minutes, it should turn battery off to save energy.
Reason2: Modern batteries should not be completely discharged. When the robot isn't able to charge for some reason and when the battery is below a certain threshold, it should be able to switch off the battery itself (undervoltage protection)
Idea:
- User presses existing START/POWER button, that switches on the MOSFET for the time of pressing
- Arduino starts and immediately also switches on MOSFET (via Arduino pinBatterySwitch)
- If undervoltage detected, Arduino switches off MOSFET (via Arduino pinBatterySwitch)
- Emergy button is still used for completely switching ON/OFF power
- POWER/START button: switches-on operation voltage (1st one second press), starts robot in automatic mode (2nd one second press)
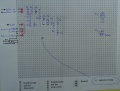
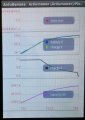
Ardumower complete system motor start current
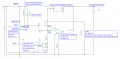
Battery switch-off circuit
Battery switch-off PCB
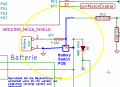
Ardumower PCB modification circuit
Ardumower PCB modification
Idea for future PCB


BOM:
1x IRF9540N  P-MOSFET   T1   (or IRF5210)
1x BC337 NPN   T2
1x Zener Diode 15V ZD15  Z1
2x Diode 1N4148 D2, D3
2x Diode 1N5819 50V D1, D4
1x 22 uF C1
1x 1k R4
2x 10k (R3, R8)
1x 30k R6
2x 100k  (R2, R7)
Robot charging
In the robot itself, the battery voltage is monitored (see diagram below). So it can be determined when the robot must go to the charging station. The robot and the voltage and the current during charging is controlled. So it can be determined whether the robot has reached the charger and when the battery is fully charged again.
robot charging circuit:
 Robot charging (+)---+------+-- relais ---- current sensor ----- battery (+)
                             |
                             ---- voltage sensing
 Robot charging (-)-- +------------------------------------------ battery (-)
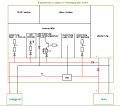
Charging station
Ideally, the charging station also powers the perimeter loop sender.
charging station circuit:
 AC power supply => Charger 24V (+)----- Charging station charger pin(+)
                    GND         (-)----- Charging station charger pin(-)
                    Charger 24V (+)----- DC-DC converter 12V => Perimeter sender MC motor driver
                                                             => Perimeter sender Arduino Nano Vin
Charge monitoring/Battery settings
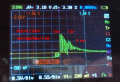
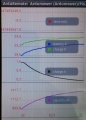
Via pfodApp (Android) you can monitor the charging process.
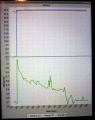
Charging plot
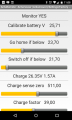
Battery settings
Battery fully charged
Charging with timeout


Charging station ideas
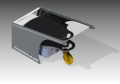
Charging contacts


Videos