Chassis (English): Unterschied zwischen den Versionen
(→Ardumower 1.0 Chassis specifications) |
(→Ardumower 1.0 Chassis specifications) |
||
| (22 dazwischenliegende Versionen von 2 Benutzern werden nicht angezeigt) | |||
| Zeile 14: | Zeile 14: | ||
File: Ardumower_chassis_pcb2.jpg | PCB mount | File: Ardumower_chassis_pcb2.jpg | PCB mount | ||
</gallery> | </gallery> | ||
| + | * Material: PE-HD plates (8mm) and alumnium profiles | ||
* Dimension (L/B/H): 60x36x25cm | * Dimension (L/B/H): 60x36x25cm | ||
* Total weight: approx 9 kg (including all components - motors, battery, PCB etc.) | * Total weight: approx 9 kg (including all components - motors, battery, PCB etc.) | ||
| Zeile 20: | Zeile 21: | ||
* Mowing disc: 190mm diameter, 3 blades | * Mowing disc: 190mm diameter, 3 blades | ||
* Wheels: 250mm diameter | * Wheels: 250mm diameter | ||
| + | * Free wheel: 125mm diameter | ||
* Gear motors: 2 x DC 24V planetary drive, 31 rpm, 2.45 Nm, 8mm shaft, with integrated encoders | * Gear motors: 2 x DC 24V planetary drive, 31 rpm, 2.45 Nm, 8mm shaft, with integrated encoders | ||
| − | * Battery: Lithium-Ion 29.4V | + | * A rotation speed up to 31 rpm allows to move the robot at sufficient speed (at up to meter/sec = 31rpm/60 * PI * 0.25m = 0.4m/sec using 250mm diameter wheels) |
| + | * A high torque (2.45Nm) guarantees that the robot can climb small hills as well (with 2 motors, 0.125 radius wheel, 31rpm = 0.4m/s = 1.5 km/h, acceleration = 0.2 ( 1/2 of nominal speed) see calculator | ||
| + | * Integrated encoders, so it can measure the rotation speed and the distance | ||
| + | * Battery: Lithium-Ion 29.4V (125Wh or 250Wh) | ||
| + | * Total energy consumption (average): 40W (60W peak, 7W idle) | ||
* Max. incline: approx. 30% | * Max. incline: approx. 30% | ||
=Videos= | =Videos= | ||
| + | #[https://youtu.be/s6gOuwkHw00?t=180 Ardumower at Berlin Maker Faire 2019 (Source: "hallo deutschland")] | ||
#[https://www.youtube.com/watch?v=8hrwDqV0vbo Building an Ardumower: chassis, motors, tires assembling] | #[https://www.youtube.com/watch?v=8hrwDqV0vbo Building an Ardumower: chassis, motors, tires assembling] | ||
#[http://www.youtube.com/watch?v=IAwKlwFU-BY&feature=youtu.be Building an Ardumower: chassis, motors, tires assembling (slow)] | #[http://www.youtube.com/watch?v=IAwKlwFU-BY&feature=youtu.be Building an Ardumower: chassis, motors, tires assembling (slow)] | ||
| Zeile 43: | Zeile 50: | ||
#[https://www.youtube.com/watch?v=UcW0OHwv0NA&feature=youtu.be 3D simulation] | #[https://www.youtube.com/watch?v=UcW0OHwv0NA&feature=youtu.be 3D simulation] | ||
| − | =Assembly | + | =Assembly= |
| + | ==Required Tools== | ||
* Screw driver | * Screw driver | ||
| − | * Imbus screw driver | + | * Different Imbus screw driver |
| + | * Different Torx screw driver | ||
| + | * Knife | ||
| + | |||
| + | ==Optional Tools== | ||
| + | * Round and flat file | ||
| + | * Electric padsaw | ||
| + | * Drill machine with drill set (3,4,6,8,10 mm drills) | ||
| + | |||
| + | ==Optional Material== | ||
| + | * M4 washer and spring washer | ||
| + | * 1 M8 carriage bolt | ||
| + | * Rain sensor case 3D print from [https://www.thingiverse.com/thing:2746360 model] | ||
| + | * Case for NTRIP receiver module for GSPS variant of the Ardumower | ||
=Case assembly= | =Case assembly= | ||
| + | |||
| + | '''This assembly instruction is work in progress!''' | ||
| + | |||
| + | We recommend to smooth all parts and remove all edges with a file and/or sand paper. | ||
| + | |||
| + | [[File:20180126 115445.jpg]] | ||
| + | |||
| + | We start with the bottom, right and left board. You have to see you remove all the remaining plastic from the notch in the bottom board. Otherwise the side boards will not fit into it. | ||
| + | |||
| + | [[File:BottomAndSides.jpg]] | ||
| + | |||
| + | Then we take the bottom board and attach the first aluminium corner. It has the advantage to use the polished polished side of the bottom board downside that the grass sticks to it less well as to the matte side. | ||
| + | |||
| + | [[File:MountProfiles1.jpg]] | ||
| + | |||
| + | Then we put two M6 nut bolts into the corners. | ||
| + | |||
| + | [[File:MountProfiles2.jpg]] | ||
| + | |||
| + | In the next step, we attach the left and right side to the bottom board and fix them with the four M6 screws | ||
| + | |||
| + | [[File:MountCorners.jpg]] | ||
| + | |||
| + | Then we take the front board. If you already know that you want to use the use ultrasonic collision detection, then remove the remaining plastic from the prepared six holes. Use again four M6 screws and the corresponding nuts and attach them between the right and left side of the chassis. | ||
| + | |||
| + | [[File:FrontPlate.jpg]] | ||
| + | |||
| + | In the next step we prepare the holes for the rear side. It is recommended to prepare the holes for the charging connector and the start switch. | ||
| + | |||
| + | [[File:RearPlate.jpg]] | ||
<gallery> | <gallery> | ||
| Zeile 59: | Zeile 110: | ||
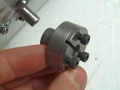
=Gear motors= | =Gear motors= | ||
| − | + | It is recommended to use washers and spring washers to prevent that the screw become unfastened. | |
<gallery> | <gallery> | ||
File:Chassis_motor_festziehen.jpg|Assemble and tighten motors | File:Chassis_motor_festziehen.jpg|Assemble and tighten motors | ||
| Zeile 66: | Zeile 117: | ||
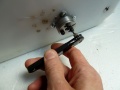
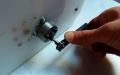
=Tires= | =Tires= | ||
| + | It is recommended to use washers and spring washers to prevent that the screw become unfastened. | ||
<gallery> | <gallery> | ||
File:Chassis_spanner_zusammensetzen2.jpg|Assemble spanner | File:Chassis_spanner_zusammensetzen2.jpg|Assemble spanner | ||
| Zeile 93: | Zeile 145: | ||
File: Chassis_mähscheibe_auswuchten.jpg |Disc balancing | File: Chassis_mähscheibe_auswuchten.jpg |Disc balancing | ||
File: Ardumower_blades.jpg |Add blades | File: Ardumower_blades.jpg |Add blades | ||
| + | File: Ardumower_blades_examples.jpg | Blades examples | ||
</gallery> | </gallery> | ||
| Zeile 102: | Zeile 155: | ||
=Further links= | =Further links= | ||
| + | |||
[http://www.ardumower.de/index.php/de/forum/general-discussion/918-beginner-ardumower-build-thread-picture-heavy?limitstart=0 Detailed step-by-step instructions] | [http://www.ardumower.de/index.php/de/forum/general-discussion/918-beginner-ardumower-build-thread-picture-heavy?limitstart=0 Detailed step-by-step instructions] | ||
| + | |||
| + | [https://forum.ardumower.de/threads/anleitung-f%C3%BCr-das-ardumower-komplettset-erstellen.23300/ Anleitung für das Ardumower Komplettset] | ||
| + | |||
| + | [https://forum.ardumower.de/threads/m%C3%A4hmotor-und-m%C3%A4hscheibe-anleitung.22220/ Mähmotor und Mähscheibe] | ||
| + | |||
| + | [https://github.com/Ardumower/ardumower/tree/master/cad/ardumower_chassis_0_99 CAD files] | ||
| + | |||
| + | [https://www.marotronics.de/Rasenroboter-Zubehoer Ardumower blades etc.] | ||
Aktuelle Version vom 27. Dezember 2020, 13:29 Uhr
This page describes the assembly of the Ardumower chassis that you can purchase via the shop ![]() .
.

Inhaltsverzeichnis
Ardumower 1.0 Chassis specifications
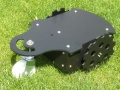
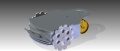
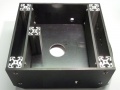
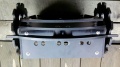
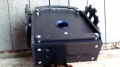
Chassis
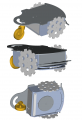
Chassis overview
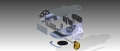
Chassis exploded
Chassis components
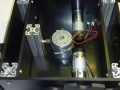
Chassis side
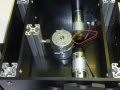
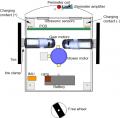
Chassis inside
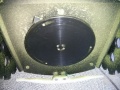
Chassis and PCB inside
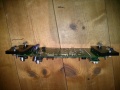
PCB mount


- Material: PE-HD plates (8mm) and alumnium profiles
- Dimension (L/B/H): 60x36x25cm
- Total weight: approx 9 kg (including all components - motors, battery, PCB etc.)
- Adjustable mower motor height
- Mowing motor: 24V DC, 3150 rpm, 140 mNm, 46W
- Mowing disc: 190mm diameter, 3 blades
- Wheels: 250mm diameter
- Free wheel: 125mm diameter
- Gear motors: 2 x DC 24V planetary drive, 31 rpm, 2.45 Nm, 8mm shaft, with integrated encoders
- A rotation speed up to 31 rpm allows to move the robot at sufficient speed (at up to meter/sec = 31rpm/60 * PI * 0.25m = 0.4m/sec using 250mm diameter wheels)
- A high torque (2.45Nm) guarantees that the robot can climb small hills as well (with 2 motors, 0.125 radius wheel, 31rpm = 0.4m/s = 1.5 km/h, acceleration = 0.2 ( 1/2 of nominal speed) see calculator
- Integrated encoders, so it can measure the rotation speed and the distance
- Battery: Lithium-Ion 29.4V (125Wh or 250Wh)
- Total energy consumption (average): 40W (60W peak, 7W idle)
- Max. incline: approx. 30%
Videos
- Ardumower at Berlin Maker Faire 2019 (Source: "hallo deutschland")
- Building an Ardumower: chassis, motors, tires assembling
- Building an Ardumower: chassis, motors, tires assembling (slow)
- Overall impression
- Loundness test
- Gear motor test
- Gear motor hardness test
- Mowing motor hardness test
- Perimeter wire test (indoor)
- Perimeter wire test (120m outdoor)
- Obstacle detection via motor current
- Obstacles detection via ultrasonic
- Robot releases itself
- Robot releasing long-time test
- Plastic blades test
- Docking test (very initial prototype)
- Rain sensor test
- 3D simulation
Assembly
Required Tools
- Screw driver
- Different Imbus screw driver
- Different Torx screw driver
- Knife
Optional Tools
- Round and flat file
- Electric padsaw
- Drill machine with drill set (3,4,6,8,10 mm drills)
Optional Material
- M4 washer and spring washer
- 1 M8 carriage bolt
- Rain sensor case 3D print from model
- Case for NTRIP receiver module for GSPS variant of the Ardumower
Case assembly
This assembly instruction is work in progress!
We recommend to smooth all parts and remove all edges with a file and/or sand paper.

We start with the bottom, right and left board. You have to see you remove all the remaining plastic from the notch in the bottom board. Otherwise the side boards will not fit into it.

Then we take the bottom board and attach the first aluminium corner. It has the advantage to use the polished polished side of the bottom board downside that the grass sticks to it less well as to the matte side.

Then we put two M6 nut bolts into the corners.

In the next step, we attach the left and right side to the bottom board and fix them with the four M6 screws

Then we take the front board. If you already know that you want to use the use ultrasonic collision detection, then remove the remaining plastic from the prepared six holes. Use again four M6 screws and the corresponding nuts and attach them between the right and left side of the chassis.

In the next step we prepare the holes for the rear side. It is recommended to prepare the holes for the charging connector and the start switch.

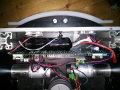
Chassis box
Chassis box with motors
Underrun protection
Bumper
Bumper (other possible position)


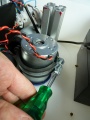
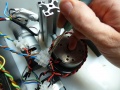
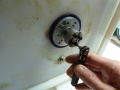
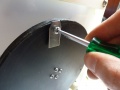
Gear motors
It is recommended to use washers and spring washers to prevent that the screw become unfastened.
Assemble and tighten motors
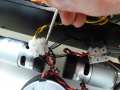
Connect motors


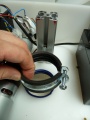
Tires
It is recommended to use washers and spring washers to prevent that the screw become unfastened.
Assemble spanner
Tighten spanner
Loose spanner screws
Tighten wheel
How to loose spanner again


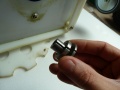
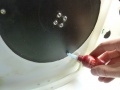
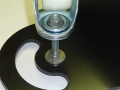
Mower motor
Mount mower motor fixing
Tighten mower motor at height
Connect mower mower
Assemble spanner
Tighten spanner


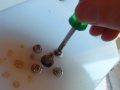
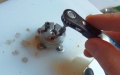
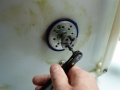
Mowing disc
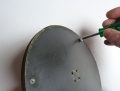
Mount nut insert
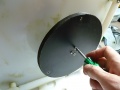
Tighten disc
Add loctite
Tighten blades
How to loose spanner again
Disc balancing
Add blades
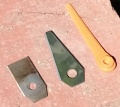
Blades examples


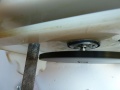
Free wheel
Free wheel bottom
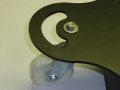
Free wheel top


Further links
Detailed step-by-step instructions