Ardumower Mini: Unterschied zwischen den Versionen
(→Steps) |
(→Building steps (PCB 1.3 option)) |
||
| (49 dazwischenliegende Versionen desselben Benutzers werden nicht angezeigt) | |||
| Zeile 1: | Zeile 1: | ||
| + | [[Image:Ardumower_mini_pcb1_3.jpg|thumb|350px|Ardumower Mini and PCB 1.3]] | ||
| + | [[File: Ardumower_mini.jpg | 500px]] | ||
| + | |||
=Abstract= | =Abstract= | ||
This page describes the 'Ardumower Mini' that can be used to implement a full Ardumower for indoor software development and | This page describes the 'Ardumower Mini' that can be used to implement a full Ardumower for indoor software development and | ||
| Zeile 5: | Zeile 8: | ||
=Needed parts= | =Needed parts= | ||
*[https://www.marotronics.de/index.php?a=152 Ardumower mini chassis including motors etc.] | *[https://www.marotronics.de/index.php?a=152 Ardumower mini chassis including motors etc.] | ||
| − | * | + | *PCB 1.3 (recommended) OR manual wiring using components (not recommended) |
| − | + | ||
| − | + | ||
| − | + | ||
| − | + | ||
| − | + | ||
| − | + | ||
| − | + | ||
| − | + | ||
=Videos= | =Videos= | ||
| − | #[https://www.youtube.com/watch?v=zjHvKAYzzoU&feature=youtu.be Ardumower | + | #[https://www.youtube.com/watch?v=vvfRZFmgq4E Ardumower Mini and PCB 1.3] |
| + | #[https://www.youtube.com/watch?v=zjHvKAYzzoU&feature=youtu.be Ardumower Mini] | ||
#[https://www.youtube.com/watch?v=Mah97zM8x5U Ardumower mini tracking perimeter wire] | #[https://www.youtube.com/watch?v=Mah97zM8x5U Ardumower mini tracking perimeter wire] | ||
| + | #[https://www.youtube.com/watch?v=bA2sRMLeSjg Project LF: lane-by-lane mowing (Gyro+odometry)] | ||
| + | #[https://www.youtube.com/watch?v=uC6drtcvkIU Project LF : robot position tracking on map] | ||
| + | #[https://www.youtube.com/watch?v=kaCt7vCkF-g Project LF: particle filter while mowing] | ||
| + | #[https://www.youtube.com/watch?v=ySj2lEhs7L0 Project LF: robot position estimation via particle filter] | ||
| + | #[https://www.youtube.com/watch?v=W3XY5LuRWHc Project LF, milestone1 (working µC, perimeter, coil, motors, buzzer, LCD)] | ||
| − | = | + | =Building steps (PCB 1.3 option)= |
| − | The Ardumower Mini can run the same software as the 'big Ardumower'. For the PCB, | + | The Ardumower Mini can run the same software as the 'big Ardumower'. For the PCB, it's recommended to use PCB 1.3. |
| − | For | + | [[File:warning.png]] <b>NOTE: Do not use more than 8 volt to operate the mini DC motors!</b> |
| + | |||
| + | For further building instructions, see PCB1.3 and for uploading the software, see Azurit Firmware. | ||
| + | |||
| + | Forum link: https://forum.ardumower.de/threads/2wd-plattform-mini-ardumower.22878/ | ||
| + | |||
| + | =Building steps (manual wiring option)= | ||
| + | If you do not want to use PCB 1.3, you can (with some limitation) connect the components directly to the Arduino Mega as shown below. The limitations are: there will be no battery charging circuit, no charging station, and of course your wiring will not look as nice as a ready PCB :-) In Azruit Firmware (mower.h), choose PCB_1_2 and DRIVER_L298N. | ||
| + | |||
| + | |||
| + | [[Image:Ardumower_mini_wiring.png|500px]] | ||
| + | Important: Connect motor driver GND to Arduino GND, so both share a common GND! | ||
| − | |||
1. Start button | 1. Start button | ||
Button (a) --- Arduino pinButton (for actual pin number, see code: mini.cpp) | Button (a) --- Arduino pinButton (for actual pin number, see code: mini.cpp) | ||
| − | Button (b) --- GND | + | Button (b) --- Arduino GND |
2. Piezo buzzer | 2. Piezo buzzer | ||
Buzzer (a) --- Arduino pinBuzzer (for actual pin number, see code: mini.cpp) | Buzzer (a) --- Arduino pinBuzzer (for actual pin number, see code: mini.cpp) | ||
| − | Buzzer (b) --- GND | + | Buzzer (b) --- Arduino GND |
3. Motor driver | 3. Motor driver | ||
| Zeile 41: | Zeile 52: | ||
+5v --- leave open | +5v --- leave open | ||
+12v --- LiPo 2s battery 7volt (+) | +12v --- LiPo 2s battery 7volt (+) | ||
| − | GND --- LiPo 2s battery 7volt (-) | + | GND --- LiPo 2s battery 7volt (-), also connect to Arduino GND |
| + | OUT1 --- left motor (+) | ||
| + | OUT2 --- left motor (-) | ||
| + | OUT3 --- right motor (+) | ||
| + | OUT4 --- right motor (-) | ||
ENA --- insert jumper (enables OUT1,2) | ENA --- insert jumper (enables OUT1,2) | ||
IN1 --- Arduino pinMotorLeftPWM (for actual pin number, see code: mini.cpp) | IN1 --- Arduino pinMotorLeftPWM (for actual pin number, see code: mini.cpp) | ||
| Zeile 49: | Zeile 64: | ||
ENB --- insert jumper (enables OUT3,4) | ENB --- insert jumper (enables OUT3,4) | ||
S1 --- insert jumper (enables 5v regulator for +12v voltage input) | S1 --- insert jumper (enables 5v regulator for +12v voltage input) | ||
| − | + | ||
| − | + | NOTE: You can test L298N motor driver without Arduino: | |
| − | + | ||
| − | + | # If you connect IN2 to HIGH (5v) and IN1 to LOW (GND), the motor should rotate forward. | |
| + | # If you connect IN2 to LOW (GND) and IN1 to HIGH (5v), the motor should rotate reverse. | ||
| + | |||
3.2 For MC33926 motor driver | 3.2 For MC33926 motor driver | ||
| + | VIN --- LiPo 2s battery 7volt (+) | ||
| + | GND --- LiPo 2s battery 7volt (-), also connect to Arduino GND | ||
| + | M1OUT1 --- left motor (+) | ||
| + | M1OUT2 --- left motor (-) | ||
| + | M2OUT1 --- right motor (+) | ||
| + | M2OUT2 --- right motor (-) | ||
M1_FB --- Arduino pinMotorLeftSense (see code: mini.cpp) | M1_FB --- Arduino pinMotorLeftSense (see code: mini.cpp) | ||
M1_SF --- Arduino pinMotorLeftFault (see code: mini.cpp) | M1_SF --- Arduino pinMotorLeftFault (see code: mini.cpp) | ||
| Zeile 71: | Zeile 94: | ||
EN --- Arduino pinMotorEnable (see code: mini.cpp) | EN --- Arduino pinMotorEnable (see code: mini.cpp) | ||
VDD --- Arduino 5V | VDD --- Arduino 5V | ||
| − | + | ||
| − | + | NOTE: You can test MC33926 motor driver without Arduino: | |
| − | + | ||
| − | + | # If you connect IN1 to HIGH (5v) and IN2 to LOW (GND), the motor should rotate forward. | |
| − | + | # If you connect IN1 to LOW (GND) and IN2 to HIGH (5v), the motor should rotate reverse. | |
| − | + | ||
4. Arduino Mega | 4. Arduino Mega | ||
Power jack --- LiPo 2s battery 7volt (outside is-/inside is+) | Power jack --- LiPo 2s battery 7volt (outside is-/inside is+) | ||
| − | 5. Bluetooth receiver | + | 5. Bluetooth receiver (optional, but recommended) |
VCC5.0 --- Arduino 5v (for 5v Bluetooth version) | VCC5.0 --- Arduino 5v (for 5v Bluetooth version) | ||
VCC3.3 --- Arduino 3.3v (for 3.3v Bluetooth version) | VCC3.3 --- Arduino 3.3v (for 3.3v Bluetooth version) | ||
| Zeile 88: | Zeile 111: | ||
GND --- Arduino GND | GND --- Arduino GND | ||
| − | 6. Sonar | + | 6. Sonar/ultrasonic (optional, but recommended) |
VCC --- Arduino 5v | VCC --- Arduino 5v | ||
Trig --- Arduino pinSonarCenterTrigger (see code: mini.cpp) | Trig --- Arduino pinSonarCenterTrigger (see code: mini.cpp) | ||
| Zeile 94: | Zeile 117: | ||
GND --- Arduino GND | GND --- Arduino GND | ||
| − | 7. Model R/C | + | 7. Model R/C (optional) |
VCC --- Arduino 5v | VCC --- Arduino 5v | ||
CHANNEL steer --- Arduino pinRemoteSteer (see code: mini.cpp) | CHANNEL steer --- Arduino pinRemoteSteer (see code: mini.cpp) | ||
CHANNEL speed --- Arduino pinRemoteSpeed (see code: mini.cpp) | CHANNEL speed --- Arduino pinRemoteSpeed (see code: mini.cpp) | ||
| − | 8. IMU (compass/gyro/accel) | + | 8. IMU (compass/gyro/accel) (optional) |
SDA --- Arduino SDA | SDA --- Arduino SDA | ||
SCL --- Arduino SCL | SCL --- Arduino SCL | ||
| Zeile 105: | Zeile 128: | ||
VCC5.0 --- Arduino 5v | VCC5.0 --- Arduino 5v | ||
| − | 9. Perimeter receiver | + | 9. Perimeter receiver (optional, but recommended) |
VCC --- Arduino 5v | VCC --- Arduino 5v | ||
IN --- coil (a) | IN --- coil (a) | ||
| Zeile 112: | Zeile 135: | ||
Out --- Arduino pinPerimeterLeft (see code: mini.cpp) | Out --- Arduino pinPerimeterLeft (see code: mini.cpp) | ||
| − | 10. Perimeter sender | + | 10. Perimeter sender (optional, but recommended) |
See [http://wiki.ardumower.de/index.php?title=Perimeter_wire#Sender Ardumower sender]. | See [http://wiki.ardumower.de/index.php?title=Perimeter_wire#Sender Ardumower sender]. | ||
| − | 11. Odometry | + | 11. Odometry/wheel encoder (optional) |
VCC --- Arduino 5v | VCC --- Arduino 5v | ||
GND --- Arduino GND | GND --- Arduino GND | ||
| Zeile 121: | Zeile 144: | ||
DO2 (right motor) --- Arduino pinOdometryRight (see code: mini.cpp) | DO2 (right motor) --- Arduino pinOdometryRight (see code: mini.cpp) | ||
NOTE: Set 'twoWayOdometrySensorUse = 1' | NOTE: Set 'twoWayOdometrySensorUse = 1' | ||
| + | |||
| + | 12. Stand-alone perimeter receiver and sender (for your own robot project) | ||
| + | |||
| + | [[File: Perimeter1.png|600px]] | ||
Aktuelle Version vom 23. Mai 2020, 10:19 Uhr
Inhaltsverzeichnis
Abstract
This page describes the 'Ardumower Mini' that can be used to implement a full Ardumower for indoor software development and
that you can purchase via the shop ![]()
Needed parts
- Ardumower mini chassis including motors etc.
- PCB 1.3 (recommended) OR manual wiring using components (not recommended)
Videos
- Ardumower Mini and PCB 1.3
- Ardumower Mini
- Ardumower mini tracking perimeter wire
- Project LF: lane-by-lane mowing (Gyro+odometry)
- Project LF : robot position tracking on map
- Project LF: particle filter while mowing
- Project LF: robot position estimation via particle filter
- Project LF, milestone1 (working µC, perimeter, coil, motors, buzzer, LCD)
Building steps (PCB 1.3 option)
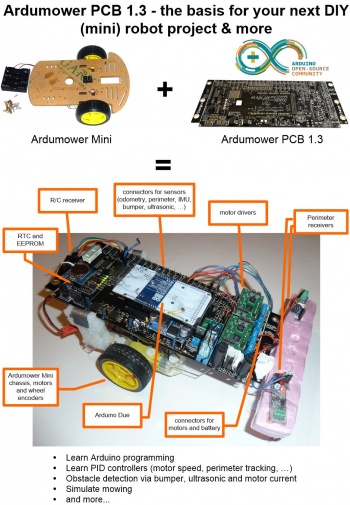
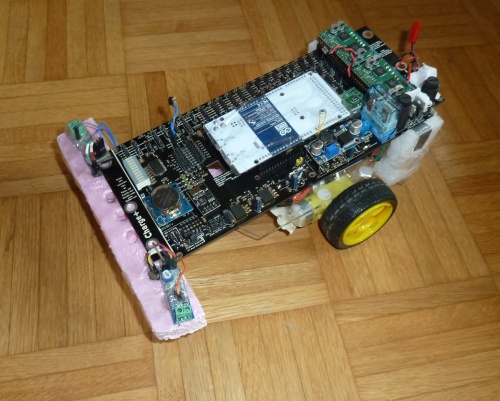
The Ardumower Mini can run the same software as the 'big Ardumower'. For the PCB, it's recommended to use PCB 1.3.
![]() NOTE: Do not use more than 8 volt to operate the mini DC motors!
NOTE: Do not use more than 8 volt to operate the mini DC motors!
For further building instructions, see PCB1.3 and for uploading the software, see Azurit Firmware.
Forum link: https://forum.ardumower.de/threads/2wd-plattform-mini-ardumower.22878/
Building steps (manual wiring option)
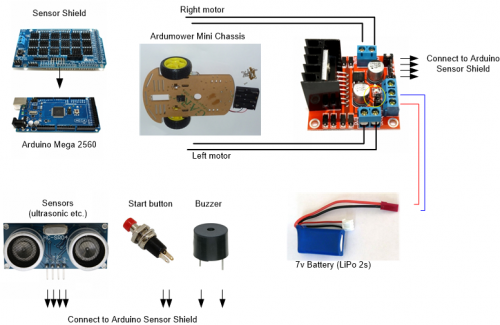
If you do not want to use PCB 1.3, you can (with some limitation) connect the components directly to the Arduino Mega as shown below. The limitations are: there will be no battery charging circuit, no charging station, and of course your wiring will not look as nice as a ready PCB :-) In Azruit Firmware (mower.h), choose PCB_1_2 and DRIVER_L298N.
 Important: Connect motor driver GND to Arduino GND, so both share a common GND!
1. Start button
Button (a) --- Arduino pinButton (for actual pin number, see code: mini.cpp)
Button (b) --- Arduino GND
2. Piezo buzzer
Buzzer (a) --- Arduino pinBuzzer (for actual pin number, see code: mini.cpp)
Buzzer (b) --- Arduino GND
3. Motor driver
3.1 For L298N motor driver
+5v  --- leave open
+12v --- LiPo 2s battery 7volt (+)
GND  --- LiPo 2s battery 7volt (-), also connect to Arduino GND
OUT1 --- left motor (+)
OUT2 --- left motor (-)
OUT3 --- right motor (+)
OUT4 --- right motor (-)
ENA  --- insert jumper (enables OUT1,2)
IN1  --- Arduino pinMotorLeftPWM  (for actual pin number, see code: mini.cpp)
IN2  --- Arduino pinMotorLeftDir  (for actual pin number, see code: mini.cpp)
IN3  --- Arduino pinMotorRightPWM (for actual pin number, see code: mini.cpp)
IN4  --- Arduino pinMotorRightDir (for actual pin number, see code: mini.cpp)
ENB  --- insert jumper (enables OUT3,4)
S1   --- insert jumper (enables 5v regulator for +12v voltage input)
NOTE: You can test L298N motor driver without Arduino:
- If you connect IN2 to HIGH (5v) and IN1 to LOW (GND), the motor should rotate forward.
- If you connect IN2 to LOW (GND) and IN1 to HIGH (5v), the motor should rotate reverse.
3.2 For MC33926 motor driver
VIN       --- LiPo 2s battery 7volt (+)
GND       --- LiPo 2s battery 7volt (-), also connect to Arduino GND
M1OUT1    --- left motor (+)
M1OUT2    --- left motor (-)
M2OUT1    --- right motor (+)
M2OUT2    --- right motor (-)
M1_FB     --- Arduino pinMotorLeftSense (see code: mini.cpp)
M1_SF     --- Arduino pinMotorLeftFault (see code: mini.cpp)
M1_PWM_D1 --- connect with jumper to GND
M1_PWM_D2 --- connect with jumper to VDD
M1_IN1    --- Arduino pinMotorLeftPWM (see code: mini.cpp)
M1_IN2    --- Arduino pinMotorLeftDir (see code: mini.cpp)
EN        --- Arduino pinMotorEnable  (see code: mini.cpp)
M2_FB     --- Arduino pinMotorRightSense (see code: mini.cpp)
M2_SF     --- Arduino pinMotorRightFault (see code: mini.cpp)
M2_PWM_D1 --- connect with jumper to GND
M2_PWM_D2 --- connect with jumper to VDD
M2_IN1    --- Arduino pinMotorRightPWM (see code: mini.cpp)
M2_IN2    --- Arduino pinMotorRightDir (see code: mini.cpp)
EN        --- Arduino pinMotorEnable (see code: mini.cpp)
VDD       --- Arduino 5V
NOTE: You can test MC33926 motor driver without Arduino:
- If you connect IN1 to HIGH (5v) and IN2 to LOW (GND), the motor should rotate forward.
- If you connect IN1 to LOW (GND) and IN2 to HIGH (5v), the motor should rotate reverse.
4. Arduino Mega
Power jack --- LiPo 2s battery 7volt (outside is-/inside is+)
5. Bluetooth receiver (optional, but recommended)
VCC5.0  --- Arduino 5v   (for 5v Bluetooth version)
VCC3.3  --- Arduino 3.3v (for 3.3v Bluetooth version)
TXD     --- Arduino RX2
RXD     --- Arduino TX2
GND     --- Arduino GND
6. Sonar/ultrasonic (optional, but recommended)
VCC     --- Arduino 5v
Trig    --- Arduino pinSonarCenterTrigger (see code: mini.cpp)
Echo    --- Arduino pinSonarCenterEcho (see code: mini.cpp)
GND     --- Arduino GND
7. Model R/C (optional)
VCC           --- Arduino 5v
CHANNEL steer --- Arduino pinRemoteSteer (see code: mini.cpp)
CHANNEL speed --- Arduino pinRemoteSpeed (see code: mini.cpp)
8. IMU (compass/gyro/accel) (optional)
SDA     --- Arduino SDA
SCL     --- Arduino SCL
GND     --- Arduino GND
VCC5.0  --- Arduino 5v
9. Perimeter receiver (optional, but recommended)
VCC     --- Arduino 5v
IN      --- coil (a)
GND     --- coil (b)
GND     --- Arduino GND
Out     --- Arduino pinPerimeterLeft (see code: mini.cpp)
10. Perimeter sender (optional, but recommended)
See Ardumower sender.
11. Odometry/wheel encoder (optional)
VCC               --- Arduino 5v
GND               --- Arduino GND
DO1 (left motor)  --- Arduino pinOdometryLeft (see code: mini.cpp)
DO2 (right motor) --- Arduino pinOdometryRight (see code: mini.cpp)
NOTE: Set 'twoWayOdometrySensorUse = 1'
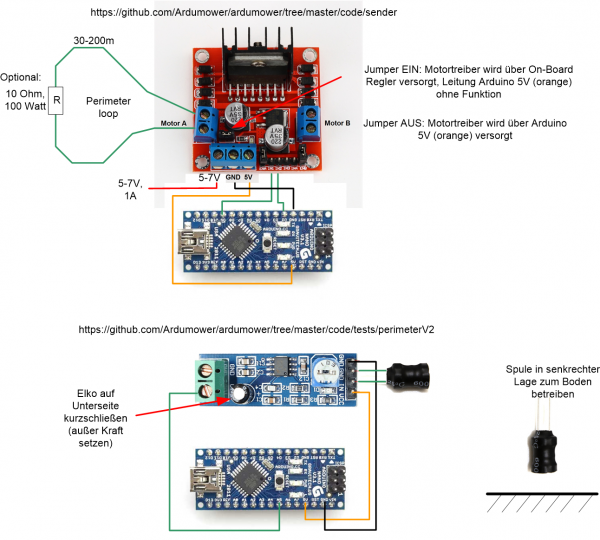
12. Stand-alone perimeter receiver and sender (for your own robot project)


