Aus www.wiki.ardumower.de
|
|
| Zeile 1: |
Zeile 1: |
| | -> [[Deutsche Version]] | | -> [[Deutsche Version]] |
| − | -> [[Russian Version]] (veraltet) | + | -> [[Russian Version]] (outdated) |
| | __NOTOC__ | | __NOTOC__ |
| | {| border=0 | | {| border=0 |
Version vom 30. Mai 2016, 17:57 Uhr
-> Deutsche Version
-> Russian Version (outdated)
Ardumower WIKI - the manual for your Ardumower
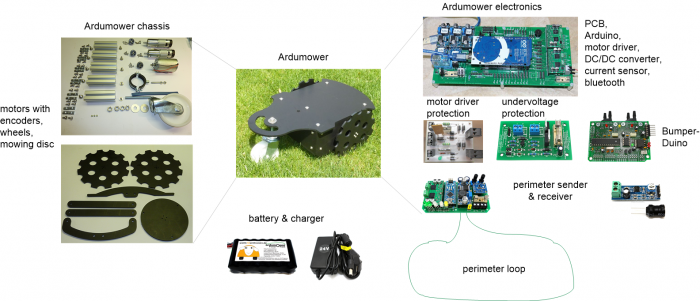
Required parts: Ardumower
All modules can be purchased as complete kits via the shop  . .
What is needed for building your Ardumower:
- The Ardumower chassis including motors
- Important modules to choose:
- Accessories Set (resistors, pin strips etc.)
- 2 x Protector Board
- 1 x Mega Board 2560 R3
- 1 x INA169 Current Sensor Board
- 2 x Dual motor driver MC33926
- 3 x DC-DC LM2596 Step-Down Converter
- 1 x Wireless Bluetooth module HC-05
- 1 x Real Time Clock I2C DS1307
- 1 x 24 Volt Charger for the Ardumower LithiumIon Battery
- 2 x Motor driver protection PCB
- Optional modules:
- BumperDuino (intelligent bumper sensor)
- Perimeter sender and receiver
- Charger Accessories Set (Lead Battery)
- Ultrasonic sensor HC-SR04 (up to 3 supported)
- Rain sensor
- IMU GY-80
- Undervoltage protection PCB
- GPS Module GY-GPS6MV2
- WIFI/Wlan Module ESP8266 ESP01
Required parts: Perimeter loop
A perimeter loop is optional but recommended.
- Perimeter sender PCB
- Important modules to choose:
- 1x Dual MC33926 Motor Driver Carrier
- 1x INA169 Analog DC Current Sensor Breakout - 60V 2,5A / 5A Marotronics
- 1 x DC-DC Spannungsregler LM2596 Step-Down Regler einstellbar
- 1 x Nano V3.0 ATmega328-AU Arduino kompatibel Mikrocontroller Board
- Perimeter receiver
- Optional modules:
- PCB case including 5 screws
- Connecting terminals 3x (2x Perimeter loop, 1x Charger)
- Socket for case 2,5
- Additional accessories depending on needs:
- A charging station is in development and will follow soon.
Building, Downloading, Running (steps)
Here are the steps for building your DIY Ardumower:
- Assemble the chassis (motors, mower slice, blades etc.)
- Assemble the PCB
- Connect motors, drivers
- Connect battery, charger
- Download software and flash the Arduino NOTE: If you have never worked with Arduino before, read our 'Arduino first steps' introduction.
- Ensure motors are connected correctly (run motor diagnostics)
- Add & configure Bluetooth module
- Calibrate ADC, battery, motor settings
- Assemble Perimeter sender, add receiver
- Add & calibrate IMU (compass, acceleration sensor)
Ardumower Reference
Your robot mower project / Dein Rasenroboter-Projekt
Describe your own robot mower project on a new WIKI page / Beschreibe Dein eigenes Rasenroboter-Projekt auf einer neuen WIKI-Site:
Your Ardumower extension / Deine Ardumower Erweiterung
Describe your own robot mower extension or improvement (optical, computer vision, IR landmarks, sound, navigation, wireless, or any other addition) on a new WIKI page / Beschreibe Deine eigene Erweiterung oder Verbesserung des Ardumowers:
Further links
|


