Brushless Drive
ArduMower Brushless Drive
see also
DIY ArduMower Brushless Driver Kit [1]
Brushless Adapter [2]
Blade-Motor Protection [3]
Inhaltsverzeichnis
Why brushless and what are the advantages?
A brushless motor offer several advantages over brushed DC motors. The main advantages are high torque to weight ratio / same power by smaler case design, more torque per watt / better energy efficiency / longer motor worktime per battery cycle , increased reliability, reduced noise, longer lifetime because of no brush and commutator erosion, and an overall reduction of maintenance and service cost.
The disadvantage is, a brushless motor and his driver are much more expensive than a brushed DC motor. But if you see the total cost over ArduMower live time, you will see an overall cost reduction abd a very fast return on investment, especially for large lawn area. The cost advantage will take place after 2-4 years (depends on lown area and mower usage), by end of life of the brushes and commutator of an DC Motor, where you have to replace the DC Motor by a new one. So for high usage on large areas, you will amortize the higher invest within 2 or 3 years and save a lot of money.
Out of this pro and cons you can select the right drive solution for your ArduMower.
DC motor drive : small lown area, less working hours of the ArduMower per week.
Brushless drive: large lown areas and 5-7 days / week usage of the ArduMower. Longer working period per battery charging cycle.
ArduMower drive concept
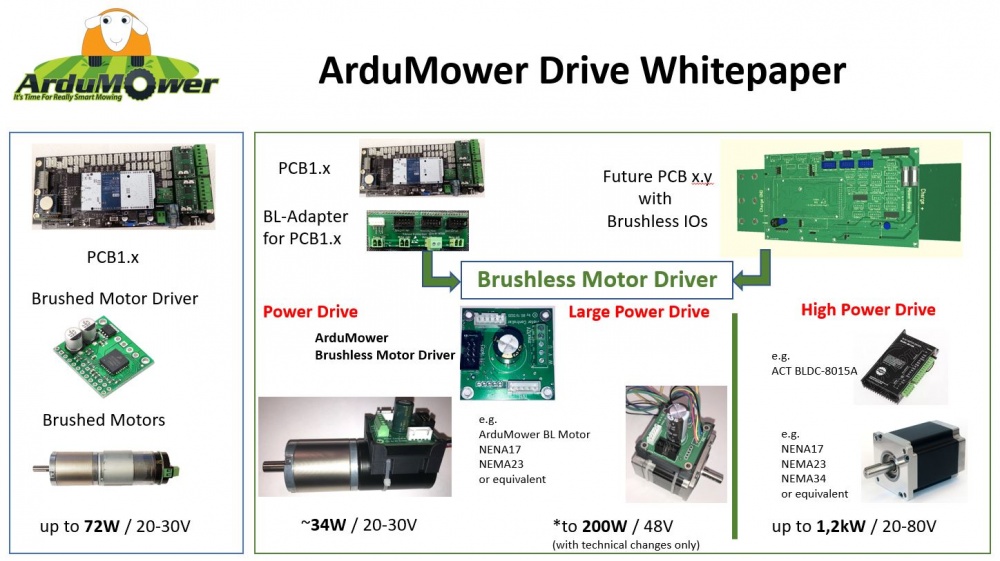
Since 2021, the ArduMower project supports a wide scale of drive options. From the powerful and cost efficient DC motor over the special AduMover Brushless Drive for larger power drive up to high power drive with commercial brushless controllers. The DC and the AduMover Brushless Drive are supported by the community and the parts will be availably in the online shop [4]. The high power drive is very special and needs some individual adaptions. If you are interested please get in contact with BerndS via ArduMower Forum.
In this part we will not cover the DC motor drive. We will focus on the AduMover Brushless Drive and how to handle it.
ArduMower Drive Concept overview:
- *for more than 32V power, you have to change the voltage protection diode.
ArduMower Brushless Drive :
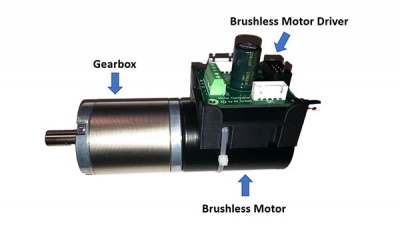
The ArduMover Brushless Drive Unit consist of 3 main parts, the gearbox, the brushless motor and the motor driver electronic. The gearbox and the motor are factory assembled and will be delivered as one unit.
The Brushless Motor Driver electronic board will be delivered as a construction kit with pre soldered SMD electronic components. The user must place and solder only one capacitor (1500uF or 2200uF) and 5 plug sockets. This is valid for all variation of the kits, we will describe later!
ArduMover Brushless Driver design
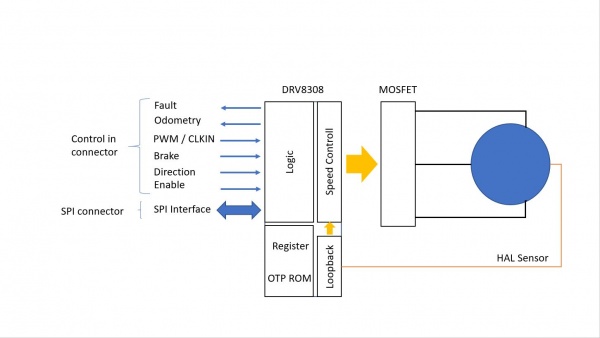
The ArduMover Brushless Driver electronic is based on the Texas Instruments Brushless DC Motor Controller DRV8308. This device has verry interesting specifications for our ArduMower, which are users right now, but also in the future for further implementation of new functions.
Brushless Driver specifications:
- Operating Supply Voltage 8.5V to 32 V
- Operating junction temperature range (Contr. & MOSFETs)  -40°C – 150°C
- max. motor current 3,5A (continues current)
   MOSFET continues current min. 5A / peak current min.30A (we use 3,5A Fuse)
   MOSFET max. Voltage 60V ( board is limited to 32V by a TVS protection diode)
- Integrated Overcurrent, Overvoltage and Overtemperature Protection
- HAL Sensor loop back, to stabilize the motor speed automatically by the DRV
- Individual programmable motor parameter for different motor designs
- Motor speed control by PWM, impulse or SPI interface (software, register controlled)
Brushless Motor specifications:
- Odometry ticks per revolution : 1194
- ~ 32 RPM
The main advantage of this controller is the flexibility, to optimize the controller parameter individually for different motor types &HAL sensors and optimize the parameter for each motor type. But the advantage is on the other hand also the disadvantage. Without programming, the Brushless Driver board it is not working. Before you can use the device, you have to write your motor parameter in the OTP (one-time programmable) non-volatile memory. Once programmed, the DRV uses this parameter by default, during power up.
IMORTANT : The OTP can programmed only ONE time! OTP changes afterwards are not possible.
But via SPI, all register parameters can be changed during operation and they will be active until power down the Board. By powering up again, the original OTP parameter will be used.
Available Brushless Motor Driver Kits
Because of the complexity of this Motor Driver, the shop is offering two types in general.
a) Pre-configured kit, this kit has a pre-loaded configuration installed. It is finaly tested to ensure the functionality. After placing and soldering the plug sockets and the capacitor by the user, the device is ready to use, if you have connected the motor and power correctly. The parameter are specially written for the motor you have bought in the ArduMower shop. Pre-configured kits are only available for motors offered in the ArduMower shop. This is specially for user with no experience about brushless motors and limited electronic knowledge. The user must be able to solder the parts. No software knowledge is needed.
b) DIY-Kit, this is a not configured Driver, as it comes out of the factory. It is for experts, able to program there own configuration to the device. It is needed if you want to use another mower than an ArduMower with other types fo motors. For this, you need expert knowledge about electronics / brushless motors and software skill. With this kits, you are working on you own risk.
Brushless Drive Architecture
Brushless Driver Power Cable
For the max. current of 4 Amp. you should use a cable with > 0,24mm², better use a 0,5mm² cable, it is the max. diameter for the clips. Do not use cable with more diameter, you get problem in conneting them to the power clip.
Brushless Drive Test Software
Here you will find the Arduino software to test and write the motor parameter: https://github.com/Ardumower/ardumower/tree/master/code/Brushless/DRV8308_SPI_Nano
Here you will find the Arduino software to test and write the motor parameter:
To work with, open the file DRV8308_SPI_Nano.ino with Arduino Sketch, compile ist and load it to the prepared Arduino Nano.
Open the Sketch Monitor and you will see the DRV8308 register status.
Enter a questionmark “?” and you get a list of all valid comands.
To change the driver parameter you must cjange the definition in the program code directly. Each reg. hast ist own definition:
- define Reg00
.. ..
- define Reg0B
A parameter discrition you will finde in the DRV8308 Datasheet[5], at page 37-40.
If you will burn the one time memory, you must change the #define Burn_Enl false //true parameter to true. Then the Nano is able to burn the parameter. Type "B" & Enter to burn the parameter and a "Y" after you hafe read the waring "Write OTP memory? It can programed only once!" and then press Enter
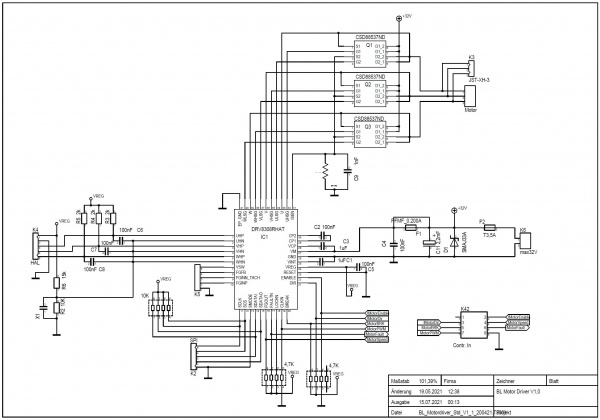
Schematics
Bug fix
See the combination changes of Brushless Adapter Version in combination with BL Driver Version. Link:
https://wiki.ardumower.de/index.php?title=Brushless_Adapter#ArduMower_Brushless_Adapter
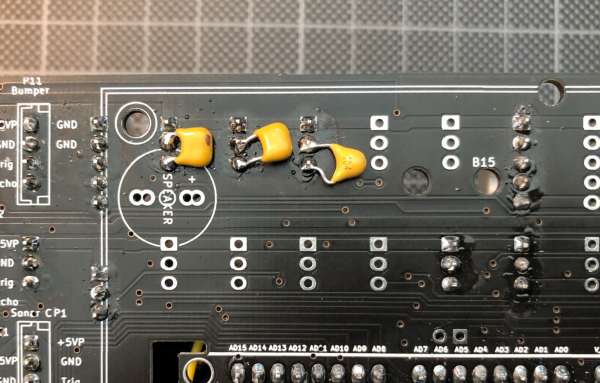
if you use ArduMower Brushless Adapter V1.0 (Stand10.01.2021):
The odometry divider on PCB 1.x caused a problem with the BL odometry signal. The ArduMower will drive not synchronized, one wheel is slower. You can fix it with a 220nF an each ot the odometry inputs. Take care that you use the latest version of sunray SW. Not needed for Brushless Adapter V1.1 or higher.
