Getting started: Unterschied zwischen den Versionen
Aus www.wiki.ardumower.de
(→Steps (overview)) |
(→Steps (overview)) |
||
| Zeile 15: | Zeile 15: | ||
#[[Ardumower PCB| Assemble the PCB]] | #[[Ardumower PCB| Assemble the PCB]] | ||
#[[Motor driver| Connect motors]] | #[[Motor driver| Connect motors]] | ||
| − | #[[Charging| Connect battery]] | + | #[[Charging| Connect battery, charger]] |
#[[Ardumower PCB| Download software and flash the Arduino]] <b>NOTE</b>: If you have never worked with Arduino before, read our <b>[http://wiki.ardumower.de/index.php?title=Arduino_first_steps 'Arduino first steps' introduction]</b>. | #[[Ardumower PCB| Download software and flash the Arduino]] <b>NOTE</b>: If you have never worked with Arduino before, read our <b>[http://wiki.ardumower.de/index.php?title=Arduino_first_steps 'Arduino first steps' introduction]</b>. | ||
#Using Arduino serial console: | #Using Arduino serial console: | ||
Aktuelle Version vom 27. Februar 2015, 14:31 Uhr

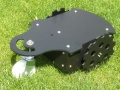
Build
Download
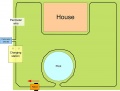
Run!


Steps (overview)
Here are the overall steps for building your DIY Ardumower:
- Assemble the chassis (motors, mower slice, blades etc.)
- Assemble the PCB
- Connect motors
- Connect battery, charger
- Download software and flash the Arduino NOTE: If you have never worked with Arduino before, read our 'Arduino first steps' introduction.
- Using Arduino serial console:
- Using Android pfodApp: