Getting started: Unterschied zwischen den Versionen
Aus www.wiki.ardumower.de
| Zeile 19: | Zeile 19: | ||
##[[Ardumower PCB|Calibrate battery, motors etc.]] | ##[[Ardumower PCB|Calibrate battery, motors etc.]] | ||
##[[IMU|Calibrate IMU]] | ##[[IMU|Calibrate IMU]] | ||
| + | |||
| + | |||
| + | =Videos= | ||
| + | #[http://www.youtube.com/watch?v=TRpXDBNEubo&feature=youtu.be Introduction] | ||
| + | #[http://www.youtube.com/watch?v=5v975n5punU Ambrogio L50 (1) goes Ardumower] | ||
| + | #[https://www.youtube.com/watch?v=PSE3Z3txa4M Ambrogio L50 (2) goes Ardumower] | ||
| + | #[http://www.youtube.com/watch?v=zglWu2ykDmo Rotenbach SPM08-320 goes Ardumower] | ||
| + | #[http://www.youtube.com/watch?feature=player_embedded&v=RgdiXK1a2Ys Promotion] | ||
Version vom 14. September 2014, 13:19 Uhr
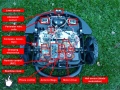
Build
Download
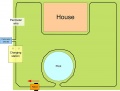
Run!


Steps
Here are the overall steps for building your DIY Ardumower:
- Assemble the chassis (motors, mower slice, blades etc.)
- Assemble the PCB
- Connect motors, battery
- Flash the Arduino
- Using Arduino serial console:
- Using Android pfodApp: